Optional Accessories 19
Doc 01-G0674
Rev E
Optional Accessories
CAUTION
Turn off power before working inside gate enclosure.
Vehicle Detectors
Almost all types of vehicle detectors may be used in conjunction with both model BG770 and BG790.
More than one detector may be connected to the gate, and may be mounted inside of the cabinet.
Connect the detector(s) according to the instructions on the wiring diagrams supplied with the gate and
with the detector itself.
FACTORY SUPPLIED PLUG-IN DETECTORS
LiftMaster P/N 71-416-7NH = 24V
Please note: Previous models used 115V detectors (P/N 71-416-3NH).
OPEN LOOP DETECTOR
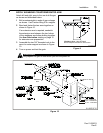
1 Snap the detector onto one set of the four board mount standoffs located on the inside of
the electrical cabinet. Plug the harness into the connector marked "OPEN".
2 Connect the two loop wires to terminals P1 and P2 as shown on the wiring diagram.
HOLD OPEN LOOP DETECTOR
1 Snap the detector onto one set of the four board mount standoffs located on the inside of
the electrical cabinet. Plug the harness into the connector marked "HOLD OPEN".
2 Connect the loop wires to terminals P3 and P4 as shown on the wiring diagram.
Radio Controls
All types of standard radio controls may be used in conjunction with model BG770 and BG790. If the
receiver is mounted inside of the gate enclosure, a commercial coaxial antenna should be used and
extended through the side of the cabinet.
POWER CONNECTION
All radio receivers require a power supply. If the receiver requires 24 volts AC you may power the
unit from the gate control circuit. To do this, connect the radio receiver power wires to Terminals
#3 and #6 on the control terminal strip. If the receiver requires 115 volts AC or other power, you
will need a separate power source.
A standard residential door radio receiver has a three wire connection marked 1, 2, 3. If you have
this type, you may connect to operator terminals R3, R1, and R6. The transmitter button will open
the gate if it is fully closed.
CONTROL
If you have a standard residential 3 wire receiver and made the power connection described on
page 19, you are finished with the radio connections. If you want to use a radio control (such as a
single button), you must order an optional kit (P/N 90-PGR).


