


Installation 18
Doc 01-G0674
Rev E
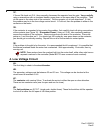
Step 6:
Limit Switch Adjustments
Auxiliary Close Limit Switch
Close Limit Switch
Open Limit Switch
CLOSE
Direction
OPEN
Direction
01-G0674F16
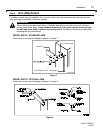
Figure 14: Limit Switch Layout
CLOSE LIMIT SWITCH
The CLOSE limit switch is preset at the factory. If you rotated the pulley in section Arm and
Turnbuckle Shaft Adjustments (page 16), you will need to reset the cam on the CLOSE limit
switch.
1 Back out the set screw on the cam. Then rotate the cam in the close direction so that the
switch just clicks when the gate arm is in its lowest position (see Figure 14).
2 When the cam is in the desired position, retighten the set screw. This adjustment may
have to be fine tuned after turning on power and running the unit for the first time.
AUXILIARY CLOSE LIMIT SWITCH
The AUXILIARY CLOSE limit switch is preset at the factory. If you made an adjustment to the
CLOSE cam, you will need to adjust the cam on the AUXILIARY CLOSE limit switch also.
1 Position the AUXILIARY CLOSE cam slightly ahead of the CLOSE cam. When the gate
arm is on its down travel, the AUXILIARY CLOSE switch will click just before the CLOSE
switch.
2 When the cam is in the desired position, retighten the set screw.
OPEN LIMIT SWITCH
The OPEN limit switch is preset the factory. This setting may have to be fine tuned after running
the unit for the first time.
1 Loosen the OPEN cam and rotate in the open direction until the switch just clicks. See
Figure 14.
2 Retighten the cam.