


SERVICE
WARNING
NEVER reach into unit while
fan is running. LOCK OPEN
AND TAG unit disconnect
before working on fan. Remove
fuses and take them with you
after noting this on tag.
CAUTION
1. Sharp edges of coil fins are exposed. To
prevent injury, cover top of evaporator
with cardboard or a few layers of heavy
tape.
2. To avoid coil damage, cover evaporator
face with plywood or other rigid sheet
material. If any coil fins are mashed or
bent, straighten with a coil fin comb of the
proper tooth spacing (refer to “coil
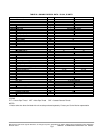
fins/inch” in Table 1). Check for
refrigerant leaks.
Return-Air Grille Removal
1. Pull grille out from top.
2. Pull grille up to release hinge pins from lower panel.
3. To reassemble, reverse procedure.
Access Panel Removal - Remove return-air grille as
described above.
Remove the panel fastening screws now exposed.
TOP PANEL - Pull out and down.
BOTTOM - Pull out and up.
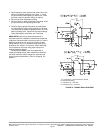
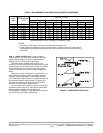
Evaporator Fan Adjustment - Observe fan compartment
Caution note above. The fan motor pulleys are factory set
at the fan speeds listed in Table 1.
TO CHANGE FAN SPEED
1. Shut off unit power supply.
2. Loosen fan belt by loosening fan motor from mounting
bracket. Do not loosen fan motor mounting bracket
from unit.
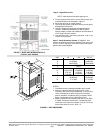
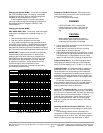
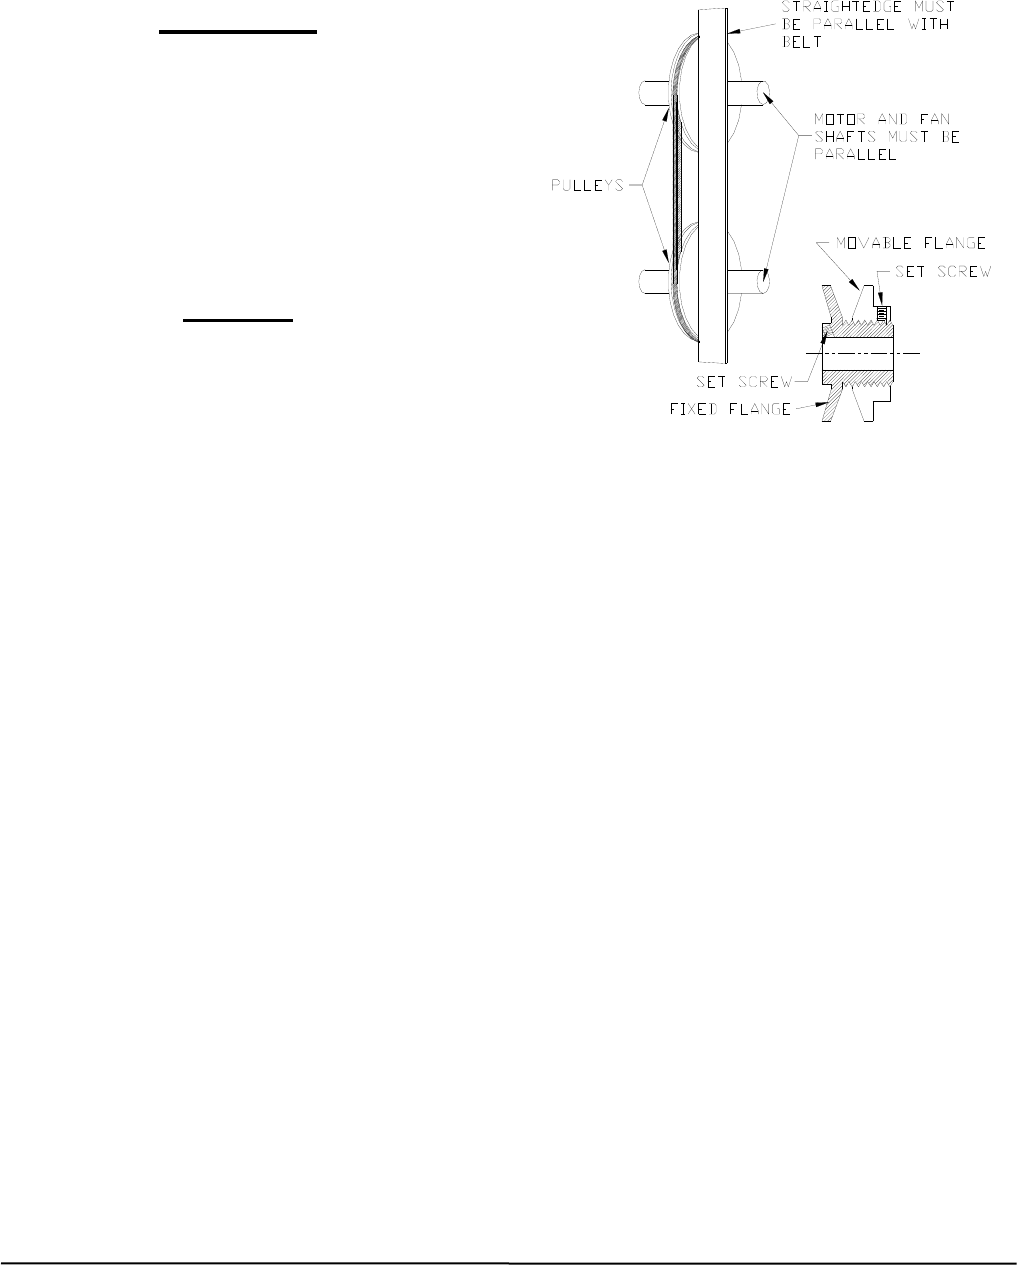
3. Loosen movable pulley flange set screw (Figure. 8).
4. Screw movable flange toward fixed flange to increase
fan speed and away from fixed flange to decrease
speed. Increasing fan speed increases load on motor.
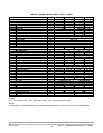
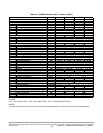
Do not exceed maximum allowable fan speed (Tables
1A/B/C/2A/B/C) or motor full load amps indicated on
motor nameplate.
5. Set movable flange set screw at nearest flat of pulley
hub and tighten set screw.
FIGURE 8 - FAN PULLEY ADJUSTMENT
6. Check pulley alignment and belt tension adjustment as
described below.
7. Check fan operation. Repeat above procedure as
required.
PULLEY ALIGNMENT - Shut off unit power supply.
Loosen fan motor pulley set screws and slide fan pulley
along fan shaft. Make angular alignment by loosening
motor from mounting bracket (See Figure. 8).
BELT TENSION ADJUSTMENT - Shut off unit power
supply. Loosen fan motor from mounting bracket. Do not
loosen motor mounting bracket from unit. Move fan motor
up or down until proper belt tension is achieved (approxi-
mately 3/4-in. deflection with 8-pound tension at midpoint
of belt span).
Lubrication - Fan motor and fan shaft bearings are
lubricated for the life of the bearings. No re-lubrication is
required
Return-Air Filters - Inspect filters twice monthly and clean
as required by operating conditions. Filter size and type
are listed in Tables 1A/B/C/2A/B/C. To clean filters flush
with hot water or steam or soak in a mild water solution of
soap or detergent. Refer to filter manufacturer's
instructions as applicable.
Do not operate unit without return-air filters in place.
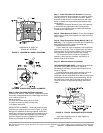
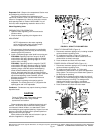
Condensate Drains - Clean the drain line and unit drain
pan at the start of each cooling season. Check flow by
pouring water into drain. Be sure trap is filled as shown in
Figure. 7 to maintain an air seal.
Manufacturer reserves the right to discontinue, or change at any time, specifications or designs without notice and without incurring obligations
Printed in U.S.A. 90MA-3SI SUPERCEDES FORM 62-02971-00 09-2009
Pg 13