9
Step 5—Select and Install Ductwork
Thedesign a ndinstallationoftheductsystem mustbeinaccordance
with the standards of the NFPA for installation of non--residence
type air conditioning and ventilating systems, NFPA 90A or
residence type, NFPA 90B and/or local codes and ordinances.
Selectandsizeductwork,supply--airregisters,andreturn airgrilles
according to ASHRAE (American Society of Heating,
Refrigeration,and AirConditioning Engineers)recommendations.
Theunithasductflangesonthesupply--andreturn--airopeningson
the side of the unit.
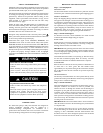
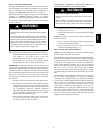
ELECTRICAL OPERATION HAZARD
Failure to follow this warning could result in personal injury
or death.
For vertical supply and return units, tools orparts could drop
into ductwork, therefore, install a90 degree turn in thereturn
ductwork between the unit and the conditioned space. If a 90
degree elbow cannot be installed, then a grille of sufficient
strength and density should be installed to prevent objects
from falling into t he conditioned s pace. Units with electric
heatersrequire 90 degree elbow in supply duct.
!
WARNING
When designing and installing ductwork, consider the following:
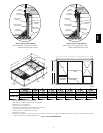
1. Allunitsshouldhavefield -- suppliedfiltersoraccessoryfilter
rack installed in the return--air s ide of the unit.
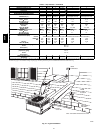
Recommended sizes for filters are shown in Table 1.
2. Avoid abrupt duct size increases and reductions. Abrupt
change in duct size adversely affects air performance.
IMPORTANT: Use flexible connectors between ductwork and
unit to prevent transmission of vibration. Use suitable gaskets to
ensureweathertightandairtightseal.Whenelectricheatisinstalled,
use fireproof canvas (or similar heat resistant material) connector
betweenductworkandunitdischargeconnection.Ifflexibleductis
used, i nsert a sheet metal sleeve i nside duct. Heat resistant duct
connector (or sheet metal sleeve) must extend 24--in. from electric
heater element.
3. Size ductwork for max cooling air quantity (400 cfm/ton).
4. Seal,insulate,andweatherproofallexternalductwork.Seal,
insulateand coverwith avaporbarrierallductworkpassing
through conditioned spaces. Follow latest Sheet Metal and
Air Conditioning Contractors National Association
(SMACNA) and Air Conditioning ContractorsAssociation
(ACCA) minimum installation standards for residential
heating and air conditioning systems.
5. Secure all ducts to building structure. Flash, weatherproof,
and vibration-- isolate duct openings in wall or roof
according to good construction practices.
CONVERTING HORIZONTAL DISCHARGE UNITS TO
DOWNFLOW (VERTICAL) DISCHARGE UNITS
ELECTRICAL SHOCK HAZARD
Failure to follow this warning could result in personal injury
or death.
Before installing or servicing system, always turn off main
power to system. There may be more than one disconnect
switch.Turn of f accessory heater power switch if applicable.
!
WARNING
1. Openallelectricaldisconnectsand installlockouttagbefore
starting any service work.
2. Removeside ductcovers toaccessbottomreturn and supply
knockouts.
NOTE: These panels are held in place with tabs similar to an
electrical knockout.
3. Use a screwdriver and hammer to remove the panels in the
bottom of the composite unit base.
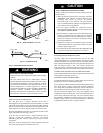
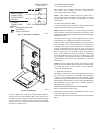
4. Ensure the side duct covers are in place to block off the
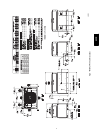
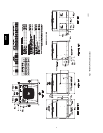
horizontal air openings (See Fig. 11).
Step 6—Provide for Condensate Disposal
NOTE: Ensure that condensate--water disposal methods comply
with local codes, restrictions, and practices.
Theunitsdisposeofcondensatethrougha3/4in.NPTfemalefitting
that exits on thecompressor end ofthe unit. Condensate watercan
be drained directly onto the roof in rooftop installations (where
permitted) or onto a gravel apron in ground level installations.
Install a field-- supplied condensate trap at end of condensate
connection to ensure proper drainage. Make sure that the outlet of
the trap is at least 1 in. lower than the drain-- pan condensate
connectiontopreventthepanfromoverflowing.Primethetrapwith
water.Whenusingagravelapron,makesureitslopesawayfromthe
unit.
Iftheinstallationrequiresdrainingthecondensatewaterawayfrom
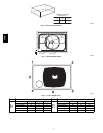
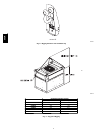
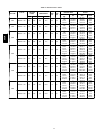
the unit, install a field-- supplied 2 -- in. trap at the condensate
connection toensure properdrainage. Condensatetrap isavailable
asan accessory oris field--supplied.Makesurethat theoutletofthe
trap is at least 1 in. lower than the unit drain-- pan condensate
connection to prevent the pan from overflowing. Connect a drain
trough using a minimum of field--supplied 3/4 --in. PVC or
field --supplied 3/4 --in. copper pipe at outlet end of the 2 -- in. trap
(See Fig. 12). Do not undersize the tube. Pitch the drain trough
downwardataslopeofatleast1in.forevery10ft.ofhorizontalrun.
Be sure to check the drain trough for leaks. Prime the trap at the
beginning of thecooling season start--up.
50CR


