2
SAFETY CONSIDERATIONS
Installation and servicingofthisequipmentcanbehazardousdueto
mechanical and electrical components. Only trained and qualified
personnel should install, repair, or service this equipment.
Untrained personnelcanperformbasicmaintenancefunctionssuch
as cleaning and replacing air filters. All other operations must be
performed by trained service personnel. When working on this
equipment, observe precautions in the literature, on t ags, and on
labels attached to or shipped with the unit and other safety
precautions that may apply.
Follow a ll safety codes. Installation must be in compliance with
local and national building codes. Wear safety glasses, protective
clothing, and work gloves. Have fire extinguisher available. Read
these instructions thoroughly and follow all warnings or cautions
included in literature and attached to the unit.
Recognize safety information. This is the safety--alert symbol
!
!
Whenyouseethissymbolontheunitandininstructionsormanuals,
be alert to the potential for personal injury.
Understand these signal words; DANGER, WARNING, and
CAUTION. These words are used with the safety--alert symbol.
DANGER identifies the most serious hazards which will result in
severepersonalinjuryordeath.WARNINGsignifieshazardswhich
could result in personal injury or death. CAUTION is used to
identify unsafepractices which may resultinminorpersonalinjury
or product and property damage. NOTE is used to highlight
suggestionswhichwillresultin enhanced installation,reliability,or
operation.
ELECTRICAL SHOCK HAZARD
Failure to follow this warning could result in personal injury
or death.
Before installing or servicing system, always turn off main
power to system. There may be more than one disconnect
switch. Turn of f accessory heater power switch if applicable.
!
WARNING
EQUIPMENT DAMAGE HAZARD
Failure to follow this caution may result in unit component
damage.
Puron (R-- 410A) systems operate at higher pressures than
standard R-- 22 systems. DO NOT use R-- 22 service
equipment or components on Puron (R -- 410A) equipment.
Ensure service equipment is rated for Puron (R--410A).
CAUTION
!
INTRODUCTION
The 50CR heat pump is fully self--contained and designed for
outdoor installation. Standard units are shipped in a
horizontal--discharge configuration for installation on a
ground--level slab. Standard units can be converted to downflow
(vertical) discharge configurations for rooftop applications.
RECEIVING AND INSTALLATION
Step 1—Check Equipment
IDENTIFY UNIT
The unit model number and serial number are printed on the unit
informative plate. Check this information against shipping papers.
INSPECT SHIPMENT
Inspect for shipping damagewhile unit is still on shipping pallet. If
unitappearsto bedamaged oristornloosefromitsanchorage,have
it examined by transportation inspectors before removal. Forward
claim papers directly to transportation company. Manufacturer is
not responsiblefor any damage incurred in transit.Check allitems
against shipping list. Immediately notify the nearest Carrier Air
Conditioning office if any item is missing. To prevent loss or
damage, leave all parts in original packages until installation.
Step 2—Provide Unit Support
For hurricane tie downs, contact distributor for details and PE
Certificate (Professional Engineering) if required.
ROOF CURB
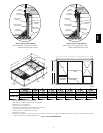
Install accessory roof curb in accordance with instructions shipped
with curb (See Fig. 2). Install insulation, cant strips, roofing, and
flashing. Ductwork must be attached to curb.
IMPORTANT:Thegasketingof theunittothe roofcurb iscritical
for a water tight seal. Install gasketing material supplied with the
roof curb. Improperly applied gasketing also can result in air leaks
and poor unit performance.
Curbshould beleveltowithin1/4in.(SeeFig.3).Thisisnecessary
for unit drain to function properly. Refer to accessory roof curb
installation instructions for additional information as required.
SLAB MOUNT
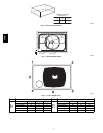
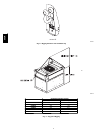
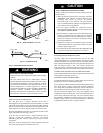
Place theunit on a solid, level concretepad that is aminimum of4
in. thick with 2 in. above grade. The slab should extend
approximately 2in.beyond thecasingon all4sidesoftheunit(See
Fig. 4). Do not secure the unit to the slab except when required by
local codes.
GROUND MOUNT
The unit may be installed either on a slab or placed directly on the
groundiflocalcodespermit.Placetheunitonlevelgroundprepared
with gravel for condensate discharge.
Step 3—Provide Clearances
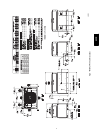
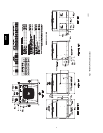
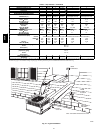
Therequiredminimum serviceclearancesareshown in Fig.6 and7.
Adequa te ventilation and outdoor air must be provided. The
outdoor fan draws air through the outdoor coil and discharges it
through the top fan grille. Be sure that the fan discharge does not
recirculate to the outdoor coil. Do not locate the unit in either a
corner or under an overhead obstruction. The minimum clearance
underapartialoverhang(suchasanormalhouseoverhang)is48in.
above theunit top.The maximum horizontal extensionof a partial
overhang must not exceed 48 in.
IMPORTANT:Donotrestrictoutdoorairflow.Anairrestrictionat
eitherthe outdoor--air inlet orthefan dischargemay bedetrimental
to compressor life.
Do not place the unit where water, ice, or snow from an overhang
or roof will damage or flood the unit. Do not install the unit on
carpeting or other combustible materials. Slab -- mounted units
should beatleast4 in.above thehighest expected waterandrunoff
levels. Do not use unit if it has been under water.
50CR


