


23
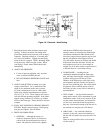
7. Bleed the fuel unit when the burner motor starts
rotating. To bleed, loosen the vent fitting (with
plastic hose attached) and catch the oil in an empty
container. Continue to bleed for 15 seconds after
oil is free of air bubbles. Tighten the vent fitting
when all the air is purged. NOTE: Bleeding might
not be necessary with a two pipe system. When
vent fitting is closed, burner flame should start
immediately.
8. ADJUST OIL PRESSURE
a. Locate oil pressure adjusting screw and turn
screw to obtain 140 PSIG pressure.
b. DO NOT REMOVE PRESSURE GAUGE until
later.
9. ADJUST AIR SETTING on burner for a light
orange colored flame. Use a smoke tester and
adjust air for minimum smoke (not to exceed
#1) with a minimum of excess air. Make final
check using suitable instrumentation to obtain a
CO
2
of 11.5 to 12.5%. These settings will assure a
safe and efficient operating condition. If the flame
appears stringy instead of a solid fire, try another
nozzle of the same type. Flame should be solid and
compact.
10. TURN "OFF" BURNER BY OPENING SERVICE
SWITCH. Remove pressure gauge. Install gauge
port plug and tighten. Re-start burner.
11. HINTS ON COMBUSTION
a. NOZZLES — Although the nozzle is a
relatively inexpensive device, its function is
critical to the successful operation of the oil
burner. The selection of the nozzle supplied
with the microTEKDV boiler is the result of
extensive testing to obtain the best flame shape
and efficient combustion. Other brands of the
same spray angle and spray pattern may be used
but may not perform at the expected level of
CO
2
and smoke. Nozzles are delicate and should
be protected from dirt and abuse. Nozzles are
mass-produced and can vary from sample to
sample. For all of those reasons a spare nozzle is
a desirable item for a serviceman to have.
b. FLAME SHAPE — Looking into the
combustion chamber through the flame plug
hole, the flame should appear straight with no
sparklers rolling up toward the top of the
chamber. If the flame drags to the right or left,
sends sparklers upward or makes wet spots on
the rear door insulation piece, the nozzle should
be replaced. If the condition persists look for
fuel leaks, air leaks, water or dirt in the fuel as
described below.
c. FUEL LEAKS — Any fuel leak between the
pump and the nozzle will be detrimental to good
combustion results. Look for wet surfaces in the
air tube, under the transformer, and around the
air inlet. Any such leaks should be repaired as
they may cause erratic burning of the fuel and in
the extreme case may become a fire hazard.
d. AIR LEAKS — Any such leaks should be
repaired, as they may cause erratic burning of
the fuel and in extreme cases may become a fire
hazard.
There are many possible causes of air leaks in
oil lines such as:
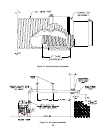
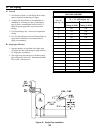
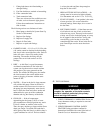
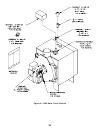
Figure 18: Electrode / Head Setting