


POSSIBLE TOOLS NEEDED FOR INSTALLATION
If you decide to install your own stove, there are several hand tools you may need to do the job.
If you do not already have them, they are readily available at most hardware stores.
Caulking gun
Large adjustable wrench (may not be needed)
Drop cloths or newspapers
Vacuum cleaner or whisk broom
Flashlight
1 tube of RTV silicone, Code 103 or 106, or high temperature rubber cement rated between
450
o
F- 600
o
F
7/32" drill bit and drill
Socket/Ratchet Set
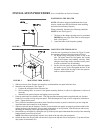
INSTALLATION PREPARATION
1. Locate furniture and other materials away from the front of the fireplace to allow free access
to the fireplace.
2. Cover the hearth and adjacent floor areas with a drop cloths to protect from soiling or
marring the surface.
3. Remove the existing fireplace damper plate.
4. Thoroughly clean the fireplace of ashes and soot.
5. Check the chimney and smoke chamber for excessive buildup of creosote or soot. Also,
check for obstructions, such as bird’s nests. If the chimney is excessively dirty, clean it, or
have someone clean it professionally BEFORE installing or using the room heater.
6. If the fireplace has an ash dump or outside air provision, these must be sealed off with metal
or tightly packed non-combustible insulation to prevent cold air from entering the fireplace
chamber.
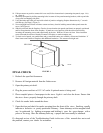
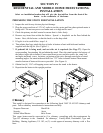
MASONRY INSERT INSTALLATION OPTIONS
This unit (appliance) may be installed into an all masonry fireplace, built in accordance with the
Uniform Building Code and the National Fire Protection Association (NFPA 211).
NOTE: Check with local building officials for any permits required for installation of this unit
and notify your insurance company before proceeding with installation
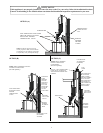
In some cases such as improperly drawing fireplaces , oversize flue liners, or to meet codes in
certain areas it is recommended that one of the flowing procedures be followed.
A. A Chimney Connector be installed from the appliance flue exit through the damper and
a air-tight face seal. See option (A) (page 7).
B. A listed Direct Connect be installed from the appliance flue exit through the damper
into the first section of the flue liner with air-tight seal. See option (B) (page 7).
C. A Positive Connect be installed from the appliance flue exit continuing up through
the entire chimney and exiting at the top of the chimney. See option (C) (page 7).
6