


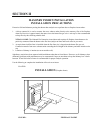
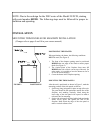
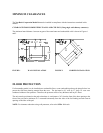

REQUIRED FIREPLACE DIMENSIONS
Minimum and/or maximum fireplace dimensions:
Height Width Depth
Min. Max. Min. Max. Min.
Model 20 22” 31” 26” 41” 16”
POSSIBLE TOOLS NEEDED FOR INSTALLATION
If you decide to install your own stove, there are several hand tools you may need to do the job. If you do not
already have them, they are readily available at most hardware stores.
Caulking gun
Large adjustable wrench (may not be needed)
Drop cloths or newspapers
Vacuum cleaner or whisk broom
Flashlight
1 tube of RTV silicone, Code 103 or 106, or high temperature rubber cement rated between 450
o
F- 600
o
F
7/32” drill bit and drill
Socket/Rachet Set
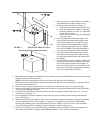
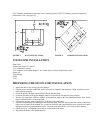
INSTALLATION PREPARATION
Fireplace:
1. Locate furniture and other materials away from the front of the fireplace to allow free access to the fireplace.
2. Cover the hearth and adjacent floor areas with the drop cloths to protect from soiling or marring the surface.
3. Remove the existing fireplace damper plate.
4. Thoroughly clean the fireplace of ashes and soot.
5. Check the chimney and smoke chamber for excessive buildup of creosote or soot. Also, check for
obstructions, such as bird’s nests. If the chimney is excessively dirty, clean it, or have someone clean it
professionally BEFORE installing or using the room heater.
6. If the fireplace has an ash dump or outside air provision, these must be sealed off with metal or tightly packed
non-combustible insulation to prevent cold air from entering the fireplace chamber.
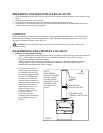
Heater:
1. Inspect the unit for any obvious physical damage.
2. Plug the power cord into a 115V AC outlet. Set switch to “Manual” and rheostat to “High” position to ensure
motor operates properly.
3. Check the primary air draft control to ensure that it operates freely.
4. Check the operations of the damper control to ensure it will open and close properly.
5. If unit is a fireplace insert remove rear side panels and place screws back in the holes before setting the unit in
the fireplace opening.