


16
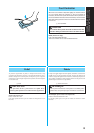
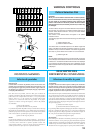
KNOWING YOUR SEWING MACHINE
CONOZCA SU MÁQUINA DE COSER
CONNAITRE SA MACHINE A COUDRE
1
3
2
1
2
34
··
· 4 · 3 · 2 · 1 · F · 0 .................
SS
AA
AA
A
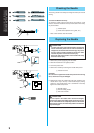
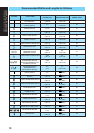
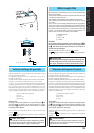
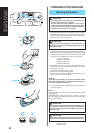
Stitch Length Dial
Depending on your selected stitch, you may need to adjust the stitch
length for best results.
The numbers marked on the Stitch Length Dial represent the length
of the stitch in millimeters (mm).
THE HIGHER THE NUMBER, THE LONGER THE STITCH.
The “0” setting does not feed the material. This is used for sewing
on a button.
The “F” area is used for making a Satin Stitch (a dense zigzag stitch)
which can be used in making buttonholes and decorative stitches.
The position needed for making the Satin Stitch varies according to
the material and thread being used. To determine the exact dial
position, you should first test the stitch and length settings on a
scrap of fabric to observe the feeding of the material.
1 Stitch length dial
2 Length
3 Fine → SS
4 Coarse
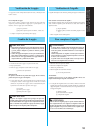
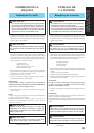
CAUTION
Do not set the Stitch Length Dial in the range shown by
AA
AA
A. If
the machine is started while the dial is set in the range shown
by
AA
AA
A, the fabric will not feed correctly and the fabric or
machine may be damaged.
Turn the dial to the left past “0” into the
SS
position.
The
SS
length is preset for the best stretch stitch performance.
CAUTION
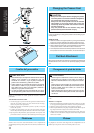
If the stitches get bunched together, lengthen the stitch length and
continue sewing. Do not continue sewing without lengthening the
stitch length, otherwise the needle may break and cause injury.
Selector de largo de puntada
Según la puntada seleccionada, puede ser necesario ajustar su largo
para lograr mejores resultados.
Los números indicados en el disco representan el largo de las
puntadas en milímetros.
CUANTO MAS ALTO EL NUMERO, MAS LARGA LA PUNTADA.
El ajuste “0” no alimenta el tejido. Sirve para coser un botón.
La zona “F” se usa para realizar bordados de realce (una puntada densa
en zigzag), que puede servir para coser ojales o como puntadas decora-
tivas. La posición necesaria para realizar puntadas de realce varia
dependiendo del tejido e hilo utilizados. Para determinar la posición
exacta del botón, conviene primero probar la puntada y los ajustes de
largo en un pedazo de tejido para ver como se alimenta el material.
1 Selector de largo de puntada
2 Largo
3 Fina → SS
4 Más largo
PRECAUCIÓN
No ponga el selector de puntada en el rango mostrado por
AA
AA
A. Si
pone la máquina en marcha con el selector puesto en el rango
mostrado por
AA
AA
A, el tejido no avanzará correctamente y el tejido o
la máquina podrían dañarse.
Gire el selector a la izquierda más allá de “0” para colocarse en la
posición
SS
.
El largo
SS
es el preestablecido para obtener el mejor rendimiento
de costura elástica.
PRECAUCIÓN
Si las puntadas se amontonan, alargue la longitud de la puntada
y siga cosiendo. No continúe cosiendo sin alargar la puntada; de
lo contrario, podría romper la aguja y causar lesiones.
Sélecteur de longueur de point
En fonction du point sélectionné, il est possible de régler la longueur de
point pour obtenir les meilleurs résultats.
Les chiffres inscrits sur le sélecteur de longueur de point représentent la
longueur du point en millimètres (mm).
PLUS LE CHIFFRE SERA ELEVE PLUS LE POINT SERA LONG.
Le réglage “0” n’entraînera pas le tissu à coudre. Il sert à coudre les boutons.
La zone “F” sert à réaliser un point de bourdon (un point zigzag serré) qui
peut servir à coudre des boutonnières ou comme point fantaisie décoratif.
La position idéale pour le point de bourdon variera en fonction du tissu et
du fil utilisés. Pour déterminer la position exacte, il est préférable de tester
d’abord les réglages de point et de longueur sur un bout de tissu pour
observer son entraînement.
1 Sélecteur de longueur de point
2 Longueur
3 Fin → SS
4 Gros
ATTENTION
Ne pas régler le sélecteur de longueur de point dans la plage indiquée
par
AA
AA
A. Si la machine se met en marche lorsque le sélecteur est dans
la plage indiqué par
AA
AA
A, le tissu n’avancera pas correctement et le tissu
ou la machine risque d’être endommagé.
Tourner le sélecteur vers la gauche, après la position “0”, pour atteindre
la position
SS
.
La longueur
SS
est prédéfinie pour des performances d’élasticité
optimales.
ATTENTION
Si les points se tassent, allongez le point et continuez de coudre. Ne
continuez pas de coudre sans allonger le point, autrement l’aiguille
pourrait se casser et vous blesser.