


LTC 8555 Series | Instruction Manual | User Information
EN
|
21
Bosch Security Systems | 29 August 2003
7. 5Keyboard Operating Instructions
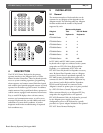
7.5.1 Camera Selection
Enter a valid camera number via the numeric keypad
and press ENTER. The selected camera then appears on
the monitor currently controlled by the keyboard.
NOTE: The keyboard's CAMERA button does not need
to be used for simple camera selections. The button is
only useful when it’s necessary to cancel a previous
incomplete action, such as canceling a monitor selection,
and return to the camera number entry mode.
7.5.2 Monitor Selection
To select which monitor will respond to the operator 's
keyboard commands, press MONITOR. Enter a valid
monitor number via the numeric keypad and press
ENTER. The number of the selected monitor will
appear on the keyboard's monitor display.
7.5.3 Lock or Unlock Control of a Camera
Press LOCK, then ON to lock a camera, or OFF to
unlock a camera. If the camera to be locked is not the
one currently being viewed, enter the camera number
via the numeric keyboard, but do not press ENTER,
before you press LOCK.
If the Status option is enabled, the section of the on-
screen overlay between the camera number and the time
now shows "RL", indicating the camera is locked.
Activating a camera lock immediately prevents other
operators (unless they have a higher priority) from
controlling the locked pan/tilt/zoom camera. Remember
to unlock the camera when finished so that all operators
can access it.
7.5.4 Lock or Unlock Control of a Monitor
Press MONITOR, then LOCK and ON to lock a
monitor, or OFF to unlock the monitor. If the monitor to
be unlocked is not the one currently being controlled by
the keyboard, enter the monitor number (but do not
press ENTER) after you press the MONITOR key.
Then press the LOCK and ON key. If the Status option
is enabled, the section of the on-screen overlay between
the camera number and the time now shows "ML",
indicating the monitor is locked. This prevents other
operators (unless they have a higher priority) from
changing the video on the monitor being used.
Remember to unlock the monitor when finished so that
all operators can access it.
NOTE: If an operator with a higher priority accesses a
locked monitor and switches to a different camera, the
lock will automatically be removed.
7. 5.5 Recording a Camera Pre-Position Scene
Select a camera with pan/tilt/zoom control (with pre-
position options), as described above. Using the joystick
and lens controls, adjust the camera to view the scene to
be stored. Press SET, then select the scene number using
the numeric keypad, and press ENTER. The camera
position is now stored, for later recall.
If an AutoDome® camera is being used, certain pre-
position commands are also used to activate operational
features and functions. Refer to the AutoDome operation
manual for complete information. If a conventional
Allegiant Receiver/Driver is being controlled, the
pan/tilt/zoom lens must have the necessary options for
pre-position operation.
Certain AutoDome models and Allegiant
Receiver/Driver series have the capability to disable a
previously stored pre-position or remove one from a pre-
position tour by pressing SET, the digit 9, followed by
the 2-digit pre-position number. Information supplied
with the device will identify whether this feature is
available.
7. 5.6 Recalling a Camera Pre-Position Scene
Select the camera to be activated and press SHOT, then
enter a previously stored camera scene number via the
numeric keypad and press ENTER. The camera
automatically returns to the previously stored position.
If a second pre-position is called prior to the completion
of the first, the camera moves directly to the second shot.
If using an AutoDome camera, certain pre-position
commands may be used to activate operational features
and functions. Refer to the AutoDome operation manual
for more information.
7. 5.7 Activate/deactivate Auxiliary Function
To turn on an auxiliary function of a remote camera
device, press ON, enter the number of the auxiliary to
be activated, and press ENTER. Holding down the
ENTER key causes the auxiliary function to be sent
repeatedly. This capability is useful when the auxiliary is
activating a housing window washer function, or a
temporary light source.