


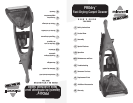

11
ww w.bi ss ell .c a 80 0. 263 .2 535
Nettoyer/remplacer le TLR PowerRoller
MC
1. Faites passer l’interrupteur d’alimentation
en position « O » (éteint) et débranchez
l’appareil.
2. Retirez les deux réservoirs, déclenchez la
poignée et placez l’appareil sur le dos.
3. Retirez les 6 vis de la plaque de la base au
moyen d’un tournevis à tête cruciforme et
mettez-les de côté avec la plaque de base.
4. Tournez l’appareil sur le côté de manière
à ce que le cordon longe le sol.
5. Retirez les 2 vis du protecteur de courroie
et conservez-les (Remarque : ces 2 vis sont
identiques aux 6 vis de la plaque de base).
Retirez le haut du protecteur de courroie et
la cheville de la brosse.
6. Décrochez la courroie du TLR PowerRoller et
appuyez sur le rouleau pour le faire passer
par le trou en bas du protecteur de courroie.
7. Nettoyez le TLR PowerRoller en le rinçant
avec de l’eau chaude et du savon doux. Si
désiré, laissez-le sécher avant de le replacer.
8. Pour le mettre en place, poussez le pignon
du TLR PowerRoller de nouveau dans le
trou et refixez la courroie. Faites à nouveau
glisser la cheville de la brosse dans le TLR
PowerRoller et alignez le haut du protecteur
de courroie sur la moitié inférieure. Replacez
les 2 vis.
9. Tournez l’appareil sur le dos et replacez le
second bras pivotant. Assurez-vous que le
bras est bien en place à la fois dans le TLR
PowerRoller et dans la base. Appuyez sur le
TLR PowerRoller pour le loger sous la buse.
10. Refixez la plaque de base avec les 6 vis.
Rangement de l’appareil
Rangez l’appareil dans une armoire ou au
sous-sol en vue de la prochaine utilisation.
Rangez l’appareil à l’abri et dans un lieu
sec. Puisqu’il contient de l’eau, il ne doit
pas être rangé dans un endroit où il y a
un risque de gel. Le gel endommagera les
composants internes de l’appareil et la
garantie sera annulée.
Entretien et soin de l’appareil
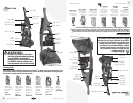
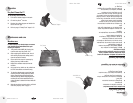
5.
3.
6.
8c.
8b.
8a.
9.
11
ww w.bi ss ell .c a 80 0. 263 .2 535
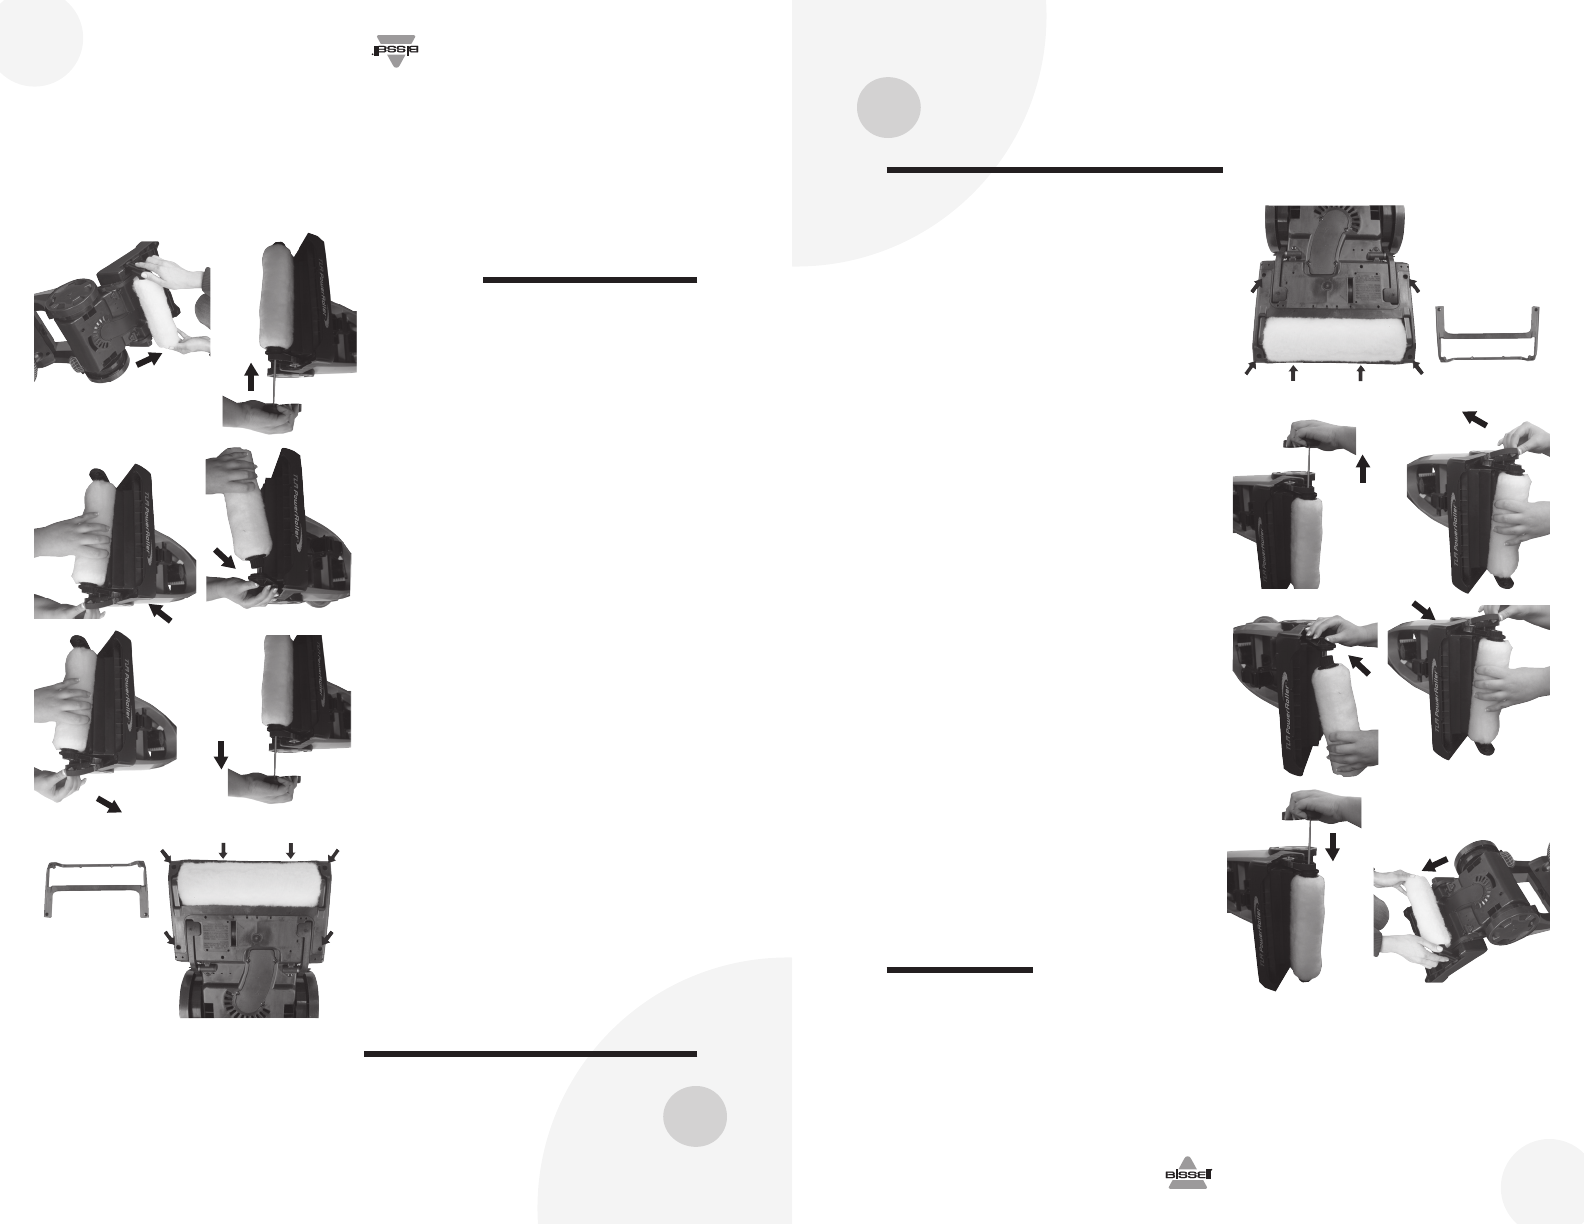
Cleaning/replacing the TLR Power Roller
TM
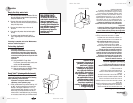
1. Turn power switch to OFF ( O ) and unplug
the machine.
2. Remove both tanks, detent the handle and
turn the machine on its back.
3. Remove the 6 screws from the sole plate
using a Phillips head screwdriver, set 6
screws and sole plate aside.
4. Turn the machine on its side so the cord side
is against the floor.
5. Remove the 2 screws from the belt guard
and set aside (Note:These 2 screws are the
same as the 6 sole plate screws). Remove
the top of the belt guard and brush dowel.
6. Unhook the belt from the TLR PowerRoller
and slide the roller down through the hole in
the belt guard bottom.
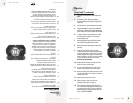
7. Clean the TLR PowerRoller by rinsing with
hot water and mild soap.Allow to dry before
replacing if desired.
8. To replace, push the cog of the TLR
PowerRoller back up through the hole and
re-attach the belt. Slide the dowel back
down through the TLR PowerRoller and line
the top of the belt guard over the bottom
half. Replace the 2 screws.
9. Turn the machine on to its back and
attach the second swing arm. Be sure the
arm is properly in place both on the TLR
PowerRoller and in the base. Push the TLR
PowerRoller down so it is nested under the
nozzle.
10. Re-attach the sole plate using the 6 screws.
Machine storage
Put the unit away in a closet or basement for
the next use. Store cleaner in a protected, dry
area. Since this product uses water, it must not
be stored where there is a danger of freezing.
Freezing will damage internal components and
void the warranty.
Maintenance and care
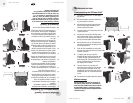
5.
3.
6.
8c.
8b.
8a.
9.