


Installation 9
Travis Industries 4050525 100-01144
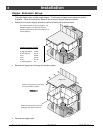
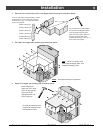
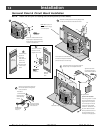
• Remove the correct knock-outs in the hopper walls following the directions below.
Use a center-punch (or other suitable
tool) to remove the appropriate knock-
outs in the hopper walls (punch the
holes out from the inside). Make sure
to support the hopper walls while
removing the knock-outs. There are 11
knock-outs for each position.
If you are using hopper extension position F, remove
the top knock-out. If using position E, remove the
second knock-out, (etc...). The second-to-bottom
knock-out is position B.
Position A Knock-Out
Position B Knock-Out
Position C Knock-Out
Position D Knock-Out
Position E Knock-Out
Position F Knock-Out
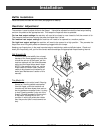
• Re-install the hopper walls following the directions below.
HINT: Attach one screw to each
side to align the hopper walls. Then
install the remaining screws.
NOTE: This hopper extension is in position D.
• Attach the hopper top following the directions below.
Re-attach the hopper top to the
hopper walls using the screws
included with the insert.
Before installing the
hopper top, use a center-
punch (or other suitable
tool) to remove the
appropriate knock-outs
on the hopper top.