


Audio Authority AVAtrix, 1156 and 1166 User Manual 15
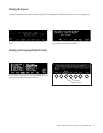
The text edit tools are indicated along the bottom of the screen: Case, Skip
Back, Skip Forward, Overstrike/Insert, and Delete.
Customizing source names makes it easier to navigate your audio/video
system.
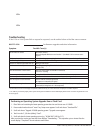
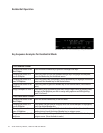
Zone Name
Zone Number
1 2 3 4 5 6
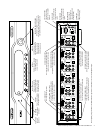
Naming and Assigning Wallplate Zones
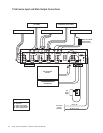
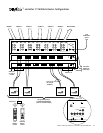
Professional mode allows the Wallplate outputs to be monitored and controlled from the 1156 or 1166 front
panel. The Zone View displays a list of up to six zones and indicates which source has been assigned to each
zone. This view makes it easy to monitor and manage the content being shown on video displays in different
rooms or areas from a central location. The number of zones is limited to six.
Naming the Sources
While naming the sources is not required, source names greatly enhance the usability of your entire system. It
i ea o comie o oce name ing he PC Congaion Uili (hon on he xeio xage), b
the names can also be chosen using the 1166 front panel controls.
Each long name can be up to 13 characters, and the short names can be up to 4 characters. The text edit tools
are indicated along the bottom of the screen: Case/Number/Symbol, Skip Back, Skip Forward, Overstrike/In-
sert, and Delete. Touch the corresponding key to use an editing tool. The Case tool allows upper and lower
case letters, numbers, or symbols. Note: using all upper case generally yields the best results.
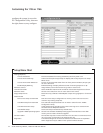
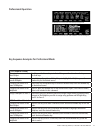
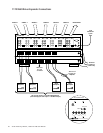
To create custom zones, enter the setup menu and select Name the Zones. Choose names from a list or enter
custom short and long zone names for each zone. Exit the Name the Zones screen and select Assign Output
Zones. A view of the Assign Output Zones screen is shown above at the right. Any Wallplate can be assigned
to any or all zones, and the Main output can belong to any or all zones. Notice that each row of the grid repre-
sents one 1176 Matrix Router. To the left is the address letter of each 1176. Above is the output number of the
Wallplate output in each column.
To assign a Wallplate to a zone, use the knob or up/down/left/right keys on the remote control to highlight a
Wallplate. Touch the number key(s) of the zone(s) to which this Wallplate should belong. (Zones are num-
bered 1-6 as noted in th example above.) To remove a Wallplate from a zone, touch the number key again.
In the example shown above at right, both Wallplate 1 and Main belong to Zone 1 which is named LVRM.
Plate 2 belongs to BED1 (Zone 3) and so on. It is usually helpful to write down a list of Wallplates for each
zone before assigning zones, especially if your system is very large or complex.
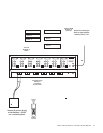
The Zone view allows the user to see the name of the locations and the
sources. Asterisk (*) indicates that one or more of the Wallplates in the zone
has been assigned a different source than the one shown.