I
2
HARDWARE INSTALLATION:
FOLLOW THE STEPS BELOW SET UP YOUR BASIC REMOTE MONITORING STARTER KIT:
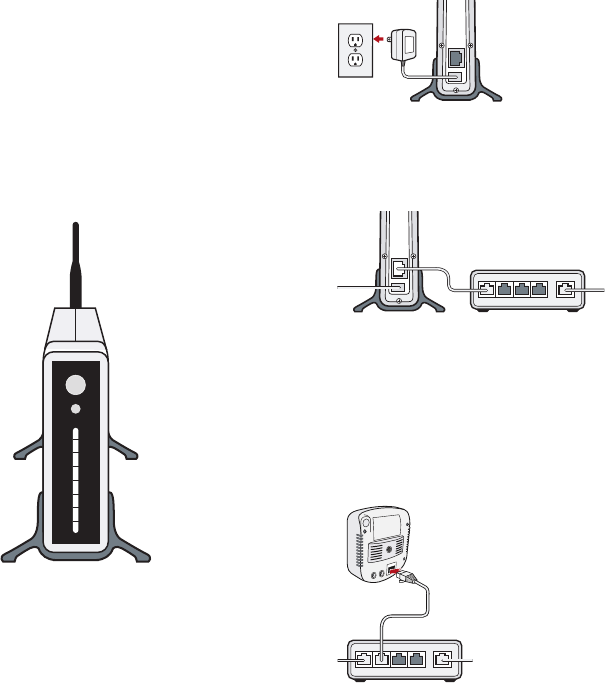
1. Take the XG1000 Controller AC Power Supply from your Controller box.
Plug the small end into the port marked Power on your XG1000 Controller
and plug the other end into an AC electrical outlet.
2. Connect supplied Ethernet Cable to the LAN Ethernet port of the XG1000 Controller
and connect the other end to a free Ethernet port on your router.
3. Connect one end of the Ethernet Cable to the LAN port of the IPC-1000 IP Camera.
Connect the other end to a second free port on your router.
NOTE: You can also connect cameras located in any room with an electrical outlet to your
router via optional HomePlug Turbo PLC Ethernet Adapters (sold separately).
INTRODUCTION TO YOUR
REMOTE MONITORING STARTER KIT ///
Thank you for your purchase of the Remote Monitoring Starter Kit. The XG1000 Controller, a small
dedicated computer, allows you to access and control cameras and other devices in your home,
and make this information available to you wherever you are. You can access the XG1000 from any
PC (must be running Windows XP, Vista, 2000 or Mac OSX) with an internet connection anywhere in
the world. You can even use the XG1000 from your cell phone. You only need to use a PC to set up
your XG1000. From then on, no PC is required for the XG1000 to function.
The system uses IP cameras. These are devices that communicate through normal internet cabling.
If you do not wish to run new Ethernet wiring in your home, you can use Power Line Communication
modules (PLC’s) to use the existing power outlets in your home, instead.
In addition to the cameras, you can also use sensor modules in your home to monitor temperature,
detect a door or window opening, wet conditions and motion. These are battery powered devices
that communicate wirelessly with the controller. You can even turn lights and appliances on and off,
by purchasing optional power controllers.
WITH YOUR REMOTE MONITORING ACCOUNT YOU CAN:
■
View Live Video
■
Check Device Status
■
Arm and Disarm Devices
■
Set Up Rules to Perform Actions Based on Events or Time of Day
■
Record Snapshots and Video Clips
■
Review Archived Events
If you have a JAVA enabled cell phone, you can access most
of the controller functions remotely through the phone.
You need to download an application to your phone
to do this. Other cell phones can receive text notifications,
but cannot view live video or control devices.
FIRST TIME SETUP ///
PREPARATION:
In addition to the items supplied in the kit you will also need a DSL/Cable Modem or other high
speed internet connection, a router - or home network device - with at least two unused ports,
and a Windows XP, Windows Vista, 2000 PC, or Mac OSX to set up the XG1000 Controller.
The PC you will be using to install the system needs to be on the same router or local network as the
XG1000 Controller. After the installation, you can access the system from any PC connected to the Internet.
Your Internet connection and router should be functional before proceeding with this installation.
As part of the purchase, you will have set up a Remote Monitoring Account; you will need the
UserID and Password that you created for this account later in the setup procedure.


