


20
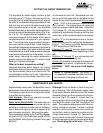
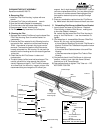
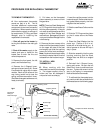
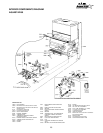
Thermostat
Tubing to
Heat Exchanger
Calibration Screw
Thermostat
Piston
Assembly
Spring
Correct height
of spring - 5/32"
or 4mm
Note: Unless setting #8 (145°
± 5, this is scalding hot water)
is needed for some rare occa-
sion we highly recommend run-
ning the heater on setting 4 or
5. This will also avoid the need
to mix a lot of cold water.
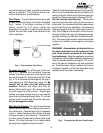
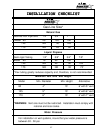
1. Turn AquaStar temperature setting to #8. This is all the way to the right, clockwise.
2. Turn on a hot water tap at the flow which will turn the AquaStar burners on. If the heater is working
correctly, this minimum activation flow will be 3/4 of a gallon a minute, for Model 125/80 and 1.1 for
Model 170. This is a flow that can fill up a quart jar in 20 sec. for the Model 125/80 and 15 sec. for the
Model 170. If the necessary flow to activate burners needs to be higher than the required minimum, see
water valve trouble shooting in your manual. The burners will come on at maximum fire and, within a
minute or so the burner flames will stabilize to a lower flame. Water temperature should be around
145°± 5. (This is scalding and too hot to put your hand under.) You should not be able to hold on to the
hot water pipe on the left side of the AquaStar.
3. Next turn the temperature dial all the way to the left to the lowest setting #2. Burner flames will become
quite small and should remain small. Water temperature, after a minute or so, should stabilize at about
105°± 5. Holding the hot water pipe should be comfortable.
4. Leaving temperature setting at #2, now, increase water flow on higher. You should see the burner
flames increase in size, and then decrease when you reduce the water flow.
5. Note: If all of the above performs according to this description, the thermostat is working correctly.
SYMPTOMS OF A DEFECTIVE OR IMPROPERLY CALIBRATED THERMOSTAT:
The hot water is too hot. Usually this results in the heater shutting down on overheat
safety. The pilot frequently goes out and needs to be relighted.
PROCEDURE TO CALIBRATE THERMOSTAT
(See diagram for correct location of screw to recalibrate)
1.Turn calibration screw in clockwise all the way, compressing the spring.
2.Back out screw 1 1/2 full turns. When set at the factory, the space from top to
bottom portion of the spring should be approximately 5/32" or 4mm.
NOTE: Turning the screw in (up) reduces the burner flames. Unscrewing it increases the
flames. If a thermostat is in good condition, and the calibration screw is properly
adjusted, the water temperature should be 145° (± 5) when temperature dial setting is
set at #8 and water is flowing at the minimum burner activating flow of
3/4 of a gallon a minute (Model 125/80) or 1.1 gpm (Model 170).
NOTE: Sometimes as a thermostat gets old (5 yrs or so), the space on the screw
adjustment may be too loose. In that case, turn the screw in another half or full turn more
if need be. It is important that you do not back this screw out so far that the burner
flames do not modulate and burners are always on full. Without modulation, the heater
will overheat and shut down.
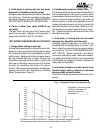
TEST PROCEDURE TO CONFIRM THERMOSTAT IS WORKING PROPERLY
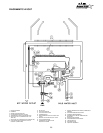
CALIBRATION AND THERMOSTAT TEST
Temperature Dial