


15
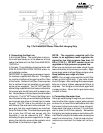
3. Poor circuit connections at the ECO
(Energy Cut-Off)
Oxidation or looseness of the ECO screw con-
nections can result in millivolt current loss through
the thermocouple safety circuit. Clean terminals
with very fine sand paper or an eraser and re-
tighten terminal screws. (See letter V in Fig 2,
page 6).
4. Faulty Energy Cut Off (ECO)- Part 34209
If cleaning and retightening the screws on the ther-
mocouple wires attached to the ECO did not fix
the problem, test the ECO by disconnecting a
wire from one side of it and reconnecting it to the
other side so both wires are making good con-
tact. Relight the pilot. If the pilot flame now re-
mains on, replace the ECO. If the flame still goes
out when the button is released, the ECO is not
defective. Go to the next step (#5 below).
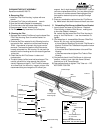
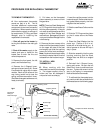
5. Poor thermocouple connection at the elec-
tromagnet (part #20883)
Note: The electromagnet is located directly be-
hind the pilot push button assembly at the rear of
the gas control. Tighten the thermocouple con-
nection to the electromagnet. The connection is
a large brass collar and a nut at the back of the
gas valve directly opposite the pilot push button
assembly. The thermocouple end is a 12 mm
(15/32") nut which screws into a 16 mm (5/8")
hex fitting on a brass collar. This large brass col-
lar must be snug before you tighten the smaller
nut in order to avoid twisting and damaging the
thin copper thermocouple tube. Tighten the ther-
mocouple nut snug but not too tight.
6. Faulty thermocouple or electromagnet
(parts #20887 and 20883).
Unless these parts are at least 8-10 years old,
it is very unlikely that they are faulty. Before
testing, reconfirm that #2 is absolutely cor-
rect, and all connections are clean and tight.
To test the thermocouple, disconnect the thermo-
couple from the electromagnet and disconnect
the thermocouple wires from the ECO.
a propane tank has been allowed to empty, or
the heater has been shut down for a long time.
Bleed all the air trapped in the gas line. Because
of the very small pilot orifice (especially on LP
gas models), bleeding out all the air could take
several minutes. Hold the pilot push button
pushed in until all the air has escaped, and the
gas has arrived.
PILOT LIGHTS BUT FLAME GOES OUT
WHEN BUTTON IS RELEASED
1. Pilot push button was not pushed in far
enough or was not held in long enough
Push pilot button in, turn it to the left, then push it
in all the way. Hold it pushed in for at least 20
seconds to give time for the pilot flame to prop-
erly heat the tip of the thermocouple before re-
leasing it.
See Lighting Instructions, Page 11.
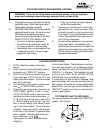
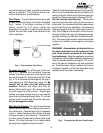
2. Pilot flame improperly aimed or is too weak
so it is not properly heating the tip of the ther-
mocouple
The pilot flame has two flames, one aimed at the
thermocouple and the other aimed at an angle
towards the burners (
see pilot flame diagram,
Fig. 4, page 13).
It is extremely important that
the flame directed on the thermocouple head be
aimed right at it, and that the pilot flame be a sharp
blue flame. If the pilot assembly has been taken
apart for cleaning, the pilot flame may no longer
be properly aimed.
4. Pilot orifice may not be correct for your
type of gas.
Pilot orifice is stamped: #18 for LP and #35 for
NG.
5. Air in the Gas Line
Note: Normally this is a problem only at the time
of installation if the pipes have been worked on,