


ENGLISH
USER MANUAL
10 FLOORTEC R 360 P 146 2598 000(1)2005-03 A
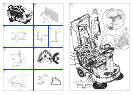
HOPPER DUMPING
1. Stop the machine by releasing the forward/reverse
gear pedal.
2. Turn the ignition switch (2, Fig. B) to “0” position.
3. Disengage the hook (21, Fig. C) by pulling its inferior
end.
4. Remove the hopper (20, Fig. C) by using the handle
(22) and dump it in special containers.
5. Reinsert the hopper and fix it by using the hook (21).
6. The machine is ready to start working again.
AFTER USING THE MACHINE
After working, before leaving the machine:
1. Lift the side brooms by using the lever (4, Fig. C).
2. Deactivate the vacuum system by using the lever (3,
Fig. C).
3. Activate the filter-shaker by using the switch (9, Fig.
B).
4. Turn the ignition switch (2, Fig. B) to the “0” position
and remove the key.
5. Close the petrol tap (1, Fig. V) in the compartment
(37, Fig. C).
6. Dump the hopper (20, Fig. C) (see previous
paragraph).
7. Engage the parking brake by rotating the lever (7, Fig.
C) backward.
PUSHING/TOWING THE MACHINE
To easily push/tow the machine, proceed as follows:
1. Open the hood (10, Fig. C).
2. Turn the switch (27, Fig. U) to the “0” position and
close the hood (10, Fig. C).
3. Push or tow the machine.
4. After pushing/towing the machine, turn the switch
(27, Fig. U) back to the “I” position.
MACHINE LONG INACTIVITY
If you foresee that the machine will not be used for more
than 30 days, proceed as follows:
1. Check that the machine storage area is dry and
clean.
2. Disconnect the negative terminal from the batteries
(21, Fig. U).
3. Slightly lift the machine so that the skirts, the main
broom and the wheels do not touch the ground.
4. Treat the petrol engine according to the indications in
the related User Manual.
FIRST PERIOD OF USE
After the first 8 hours, check the fixing and connecting
parts of the machine for proper tightening; check the
visible parts for integrity and leakage;
After the first 20 hours of work, or after the first month,
replace the petrol engine oil (see the related manual).