


ENGLISH
USER MANUAL
12 FLOORTEC 560 B 146 2590 000(1)2005-03 A
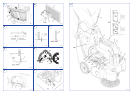
9. If necessary, adjust the skirt height by using the slots
(3, Fig. R).
10. Activate the front skirt lifting lever (27, Fig. C) and
check that the front flap (1, Fig. Q) rotates upward of
90° (as shown in figure); release the lever and check
that the skirt returns to the initial position and does not
stay in an intermediate one. If necessary, for the front
skirt control cable adjustment or replacement, refer to
the Service Manual.
11. Reassemble the removed components in the reverse
order of disassembly.
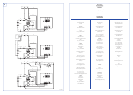
BATTERY CHARGING
1. Drive the machine on a level ground and activate the
pedal brake (26, Fig. C) (if present).
2. Turn the ignition key (2, Fig. B) to “0” position.
3. Open the hood (7, Fig. C).
4. (Only for lead battery) check the correct level of
electrolyte inside the battery; if it is necessary top up
through the caps (8, Fig. U).
5. Leave the caps (8) open for the next battery charge.
6. Clean (if necessary) the upper surface of the battery.
7. Proceed with recharging the battery according to one
of the following way depending on the presence of the
electronic battery charger (4, Fig. U).
Charging the battery with an external battery
charger
1. Check that the battery charger is suitable by referring
to the Battery Charger Operating Manual. The battery
charger voltage rating is 12V.
2. Disconnect the battery connector (3, Fig. U) and
connect it to the external battery charger.
3. Connect the battery charger to the electrical mains.
4. When the recharging is complete, disconnect the
battery charger from the electrical system and from
the battery connector (3, Fig. U).
5. (For lead batteries only) Check for correct level of
electrolyte inside the battery; if necessary, top up
through the caps and close all the caps (8).
6. Reconnect the battery connector (3, Fig. U) to the
machine.
7. Close the hood (1, Fig. U); the machine is ready to be
used.
Battery charging with optional battery charger
supplied with the machine
1. (Only for lead battery) check the correct level of
electrolyte inside the battery; if it is necessary top up
through the caps (8, Fig. U). When the correct level is
reached, clean, if necessary, the upper surface of the
battery. Leave the caps (8) open for the next battery
charge.
2. Connect the battery charger electrical cable (5, Fig.
U) to the electrical mains.
3. When the green warning light (11, Fig. U) turns on,
the battery is charged.
4. For further information about the battery charger
operation (4, Fig. U), see the Battery Charger
Operating Manual.
5. Disconnect the battery charger electrical cable (5,
Fig. U) from the electrical mains and place it in its
special housing.
6. (For lead battery only) Close all the caps (8).
7. Close the hood (1, Fig. U); the machine is ready to be
used.
WARNING!
Battery charging produces highly
explosive hydrogen gas. Charge the
batteries in well-ventilated areas and away
from naked flames.
Do not smoke while charging the batteries.
Keep the hood open while recharging the
battery.
WARNING!
Be extremely careful when charging the
battery as there may be battery fluid
leakages. The battery liquid is corrosive. If
it comes in contact with the skin or eyes,
rinse thoroughly with water and consult a
physician.
NOTE
The battery charger must be appropriate for
the battery installed on the machine.
WARNING!
Check that the voltage and frequency
shown on the machine serial number plate
(1, Fig. U) correspond to the electrical
mains values.
NOTE
When the battery charger is connected to the
electrical mains, all machine functions are
automatically cut off.