


ENGLISH
USER MANUAL
10 FLOORTEC 560 B 146 2590 000(1)2005-03 A
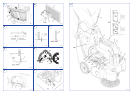
MAIN BROOM REPLACEMENT
1. Drive the machine on a level ground and activate the
pedal brake (26, Fig. C) (if present).
2. Turn the ignition key (2, Fig. B) to “0” position.
3. Loosen the knobs (1, Fig. E) on both sides of the
machine.
4. Move the broom height variation indicators (2, Fig. E)
until the broom is at the maximum ground clearance.
Screw down the knobs (1).
5. Open the hood (7, Fig. C).
6. On the left side of the machine, loosen the knob (3,
Fig. E).
7. Remove the broom cover (1, Fig. F) pressing
downward to disengage the retainers (2).
8. Remove the broom (1, Fig. G).
9. Check also that the entrainer hub (4, Fig. R) is free
from dirt or foreign materials (ropes, rags, etc.)
accidentally rolled up.
10. The new broom must be installed with the bristles
rows positioned as shown in the figure (1, Fig. H) (top
view).
11. Install the new broom on the machine and ensure that
its mesh (1, Fig. I) correctly fits into the related drive
hub (4, Fig. R).
12. Reinstall the broom cover (1, Fig. F), engaging the
retainers (2).
13. Screw down the knob (3, Fig. E).
14. Carry out the main broom height adjustment as
described in the previous paragraph.
SIDE BROOM HEIGHT ADJUSTMENT
1. Check the side broom is at the correct height from the
ground, proceeding as follows:
– Drive the machine on a level ground and lower the
side broom.
– Keep the machine stationary and rotate the side
broom for few seconds.
– Stop the side broom and move the machine.
– Check that the side broom print is, in extension
and orientation, as shown in the figure (1, Fig. J).
In case the print is not within specifications, it is
necessary to adjust the broom height, proceeding
as described in the following steps.
2. Rotate the knob (12, Fig. C) clockwise or
counter-clockwise to adjust the broom height from the
ground.
3. Perform step 1 again to check the proper adjustment
of the side broom height from ground.
4. When the broom is too worn to be adjusted, replace it
as shown in the next paragraph.
SIDE BROOM REPLACEMENT
1. Drive the machine on a level ground and activate the
pedal brake (25, Fig. C) (if present).
2. Turn the ignition key (2, Fig. B) to “0” position.
3. Introduce the hand inside the side broom and press
the tabs (1, Fig. K) inwards, then remove the broom
(2) disengaging it from the four pins (3).
4. Install the new broom on the machine engaging it on
the pins (3) and on the tabs (1).
5. Carry out the side broom height adjustment as
described in the previous paragraph.
NOTE
Brooms of various hardness are available. This
procedure is applicable to all types of brooms.
CAUTION!
It is advisable to use protective gloves
when replacing the main or side brooms
because there can be cutting debris
between the bristles.
NOTE
Brooms of various hardness are available. This
procedure is applicable to all types of brooms.
NOTE
Brooms of various hardness are available. This
procedure is applicable to all types of brooms.
CAUTION!
It is advisable to use protective gloves
when replacing the main broom because
there can be cutting debris between the
bristles.