


1-18 American-Lincoln Technology
114 RS Operator’s Manual
MAIN BROOM SERVICE INSTRUCTIONS
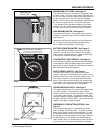
TO CHECK THE MAIN BROOM SWEEP PATTERN
Check the main broom sweep pattern after changing the broom or when poor sweeping performance is encountered
while sweeping.
1. While the machine is not moving, lower the main broom to the SWEEP position and let machine sweep in one spot
for a short period.
2. Before moving machine, move main broom lever to the OFF position and move the sweeper forward until you can
see the pattern left by the main broom bristles on the floor.
3. Check the width of the pattern on the floor to determine if the main broom requires adjustment.
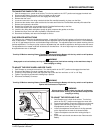
- A normal sweep pattern left on the floor will be between one and two inches wide.
- A pattern that is more than two inches wide indicates the broom linkage needs to be adjusted “UP.”
- A pattern that is less than one inch wide indicates the broom linkage needs to be adjusted “DOWN.”
WARNING
Always engage the safety latch before working under the Battery cover.
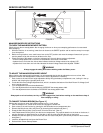
TO ADJUST THE MAIN BROOM SWEEP HEIGHT
When changing the sweep height adjustment it is recommended that the bolt be adjusted one turn at a time, After
adjustment, recheck the sweep pattern to determine if further adjustment is necessary.
1. Gain access to the main broom height adjustment bolt by lifting the battery compartment cover, locking it in the up
position and removing the right side panel cover.
2. Locate the Main Broom Height Adjustment bolt, which is located at the bottom of the Main Broom Lift linkage.(It will
have a spring around it)
3. Turn the adjustment screw as described below.
-Turn the adjustment bolt counterclockwise to INCREASE the sweep pattern width.
-Turn the adjustment screw clockwise to DECREASE the sweep pattern width.
WARNING
Always park on a level surface, turn key off, and engage wheel lock before working on the machine to keep it
from creeping or rolling.
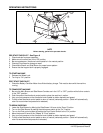
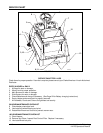
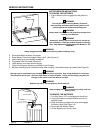
TO CHANGE THE MAIN BROOM [See Figure 11]
Replace the main broom when the bristles become worn to 1-inch length.
1. Park the sweeper on a smooth level surface and engage the wheel lock.
2. Gain access to the main broom by opening the left-hand side broom compartment door.
3. Remove the Main broom Idler hub [Item 2] by loosening the threaded knob [Item 1].
4. Grasp the Main Broom [Item 3] and remove it from the drive hub. [Item 2].
5. Insert Replacement Broom [Item 3] Into the broom compartment. Pay special attention to the slots on the broom, it
may be necessary to rotate the broom so the tabs on the drive hub align with the slots on the broom.
6. Reinstall the idler hub [Item 2] to the broom and over the locator stud [Item 4] and screw provided for the threaded
knob [Item 1].
7. Install the threaded knob and close the Broom Door.
8. Recheck Main Broom Sweep Pattern.
SERVICE INSTRUCTIONS
4
1
3
2
C0477a FIGURE 11