


American-Lincoln Technology 1-13
114 RS Operator’s Manual
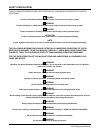
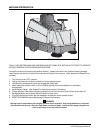
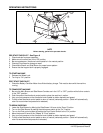
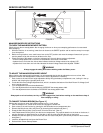
MAIN BROOM LIFT LEVER - See Figure 5
The main broom lift lever is located on the right side next to
the driver’s seat. To lower the main broom, grasp the lever,
move it to the left to clear the locking notch and pull back to
the first or second notch. The first notch is the “Sweep”
position, which is used for normal sweeping conditions, and
will result in longer broom life. The second notch is the
“Float” position and is used when sweeping very uneven
surfaces. The main broom, side brooms and vacuum fan
will start when the lever is moved from the “Off” position.
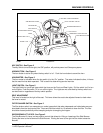
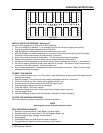
SIDE BROOMS SWITCH - See Figure 2
The Side Brooms Switch is a two-position rocker type On/
Off Switch. Depress the right side of the switch to turn the
side brooms on.
Depress the left side of the switch to turn the side brooms
off. The side brooms will rotate when the Main Broom
Lever is placed in the Sweep or Float Position.
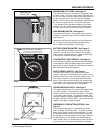
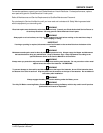
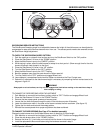
BATTERY CONDITION METER - See Figure 6
The meter shows the condition of the battery, while the
machine is running, under load. Batteries are charged
when indicator is in the green zone. When indicator stays
in the red zone, batteries must be charged.
LOW BATTERY LIGHT (OPTION) - See Figure 2
The Low Battery Shutdown prevents excessive discharging
of the batteries. When the batteries get low the indicator
light comes on and the Brooms turn off. When the indicator
light, illuminates Charge the batteries.
DUST CONTROL SWITCH - See Figure 2
The dust control switch is a two-position rocker switch
located on the right instrument panel and is used to control
operation of the vacuum fan for the dust control system. To
turn on the vacuum fan, push the right side of the rocker
switch. To turn off the vacuum fan push the left side of the
rocker switch. The vacuum fan will only operate when the
main broom lever is moved out of the “Off” position.
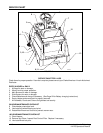
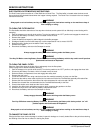
HOPPER RELEASE LATCH - See Figure 7
The Hopper Release Latch is located on the Hopper at the
rear of the sweeper. To disengage the latch, turn the
handle to the left to the nine O’clock positions. The Hopper
is now ready to be removed. To engage the Hopper latch,
ensure the hopper is properly seated and turn the handle to
the right to the three O’clock position. You will feel the latch
engage if the hopper is properly seated.
EMERGENCY STOP BUTTON (OPTION) - See
Figure 2
The emergency stop button is a Red Mushroom switch,
which is located near the key switch. To quickly shut down
power to the machine, push the large red button. To reset
the shut down button; first turn the red button clockwise in
the direction of the arrows marked on the switch. Now turn
the key switch to the “Off” position then clockwise to the
“start” position, when you release the key switch and allow
it to return to the “On” position the Sweeper will operate.
MAIN BROOM
FLOAT
SWEEP
OFF
MAIN BROOM
LIFT LEVER
BATTERY
CONDITION
-
+
CHARGE BATTERIES
WHEN NEEDLE STAYS IN RED ZONE
WHILE SWEEPER IS BEING OPERATED
HOPPER
LATCH
LOCK
LOCK
UNLOCK
MACHINE CONTROLS
C0467 FIGURE 5
C0468 FIGURE6
C0469 FIGURE 7