Install the Cabinet Artwork
EA SPORTS™ PGA TOUR
®
Golf Challenge Edition Upgrade Kit
Page 10 of 14 040-0068-01 Rev B 1/12/2006
Install the Cabinet Artwork
Note: If you are upgrading a Conversion Cabinet, refer to the section at the bottom of this page for
instructions on adjusting the artwork to fit.
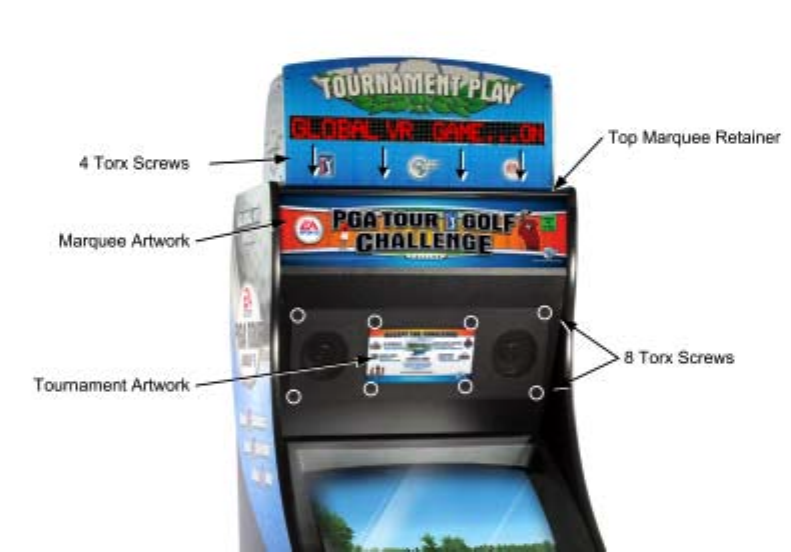
Figure 7. Installing New Cabinet Artwork
1. Remove the four (4) Torx screws holding the top marquee retainer in place and remove the
retainer.
2. Tilt the marquee glass forward and remove the old artwork.
3. Insert the new marquee artwork. Make sure the artwork is centered and flush with the bottom of
the glass.
Note: If the marquee curls when you try to install it, you may wish to use clear plastic tape to
hold it in place while you mount the glass.
4. Replace the top marquee retainer, and secure it with the screws removed previously.
5. Remove the eight (8) screws that secure the speaker and sub-marquee panel in place.
6. Remove the old sub-marquee artwork and replace it with the new artwork.
7. Replace sub-marquee panel, and secure it with the screws removed previously.
Adjusting Artwork for Conversion Cabinets
Conversion cabinet marquees and sub-marquees require trimming the graphics as follows to make
them fit the cabinet:
• Trim the sides of the marquee graphic along the printed tick marks.
• Trim the black areas from the top and bottom of the "Accept the Challenge" sub-marquee
graphic.
