


8 9
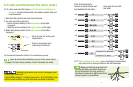
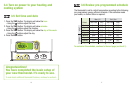
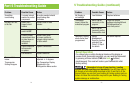
If the OLD thermostat’s
terminal is wired into the wall
and identifi ed by this letter…
…Then label its wire with
this letter:
You’ll need this information further in the installation process!
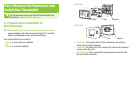
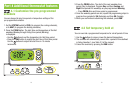
2.2.2 Label each wire that comes out of the wall and attaches to
terminals
on the old thermostat. Use labels provided with your
new thermostat.
1. Note the letter printed near each wired terminal
2. For each out-of-the-wall wire:
– fi nd its terminal letter(s) in the
left column of the table
on page 9,
– label the wire according to the
right column of the table.
3. Make the following notes in the
right column of the table
on page 9:
– Circle all your out-of-the-wall
labeled wires
– Pencil in any jumper wire
connecting 2 terminals
Mislabeling the wires could result in damage to your
heating and cooling unit.
Contact White-Rodgers
™
Customer Service at 1-877-654-9394 if your
old thermostat contains any wired terminals not listed in the table.
Note: No thermostat installation uses all of the wires shown
on page 9. In most cases, between 4 and 5 terminals are wired.
wall
C
wall
wall
RC
RH
G
RC, R
RH, 5, R5
W, 4, W1
Y, Y1
X, C
O
B
wall
wall
wall
wall
wall
wall
wall
wall
wall
G
wall
RC
wall
RH
wall
W
wall
Y
wall
C
wall
O
wall
B
wall
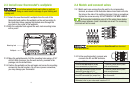
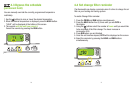
If terminal “O” is NOT wired.
If terminal “O” is wired.
C
2.2 Label and disconnect the wires (cont.)
Examples
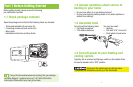
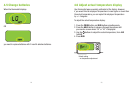
2.2.3 After labeling all the wires, use a screwdriver to disconnect
each wire from its terminal. Remove the old thermostat.
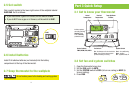
Make sure that the wires don’t fall
into the wall after you detach them from
the old thermostat. You may choose to
tape them to the wall or tightly wind them
around a pencil or screwdriver.