


6
Emergency System
EMER bypasses the Heat Pump to use the heat source wired
to terminal W2 on the thermostat. EMER is typically used when
compressor operation is not desired, or you prefer back-up
heat only.
1. Move SYSTEM switch to EMER position, EMER will fl ash
on the display.
2. Press to adjust the thermostat above room temperature.
The Aux heating system will begin to operate. The Flame
icon ( ) will display fl ashing to indicate that the Aux system
is operating.
3. Press to adjust the thermostat below room temperature.
The Aux heating system should stop operating.
Cooling System
1. Move SYSTEM switch to COOL position.
2. Press to adjust thermostat setting below room
temperature. The blower should come on immediately on
high speed, followed by cold air circulation.
3. Press to adjust temperature setting above room
temperature. The cooling system should stop operating.
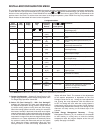
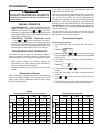
4 & 5) Select Cycle Rate Selection - The factory default
setting is (FA, CR) for all modes (Heat Pump, Heat Pump
Aux, Heat and Cool, Single Stage Heat and Single Stage
Cool). To change to slow cycling (SL, CR), press the
and keys to toggle between FA & SL.
The cycle rate differentials for different settings are:
MODE Fast Slow
FA SL
Heat Pump 1.2°F 1.7°F
HP Aux 0.8°F 1.2°F
SS Heat 0.8°F 1.2°F
SS Cool 1.2°F 1.7°F
6) Select Compressor Lockout CL OFF or ON - Selecting
CL On will cause the thermostat to wait 5 minutes between
cooling cycles. This is intended to help protect the
compressor from short cycling. Some newer compressors
already have a time delay built in and do not require this
feature. Your compressor manufacturer can tell you if the
lockout feature is already present in their system. When the
thermostat compressor time delay occurs, it will fl ash the
setpoint for up to fi ve minutes.
7) Select Backlight Display - The display backlight improves
display contrast in low lighting conditions. When the “C”
terminal is connected, selecting backlight CdL On will keep the
light on continuously. Select backlight OFF will turn the light on
momentarily when any key is pressed. When the “C” terminal
is not connected, regardless of the backlight selection, the
light will be on momentarily when any key is pressed.
8) Select Temperature Display Adjustment 4 LO to 4 HI -
Allows you to adjust the room temperature display up to 4°
higher or lower. Your thermostat was accurately calibrated
at the factory but you have the option to change the display
temperature to match your previous thermostat. The
current or adjusted room temperature will be displayed on
the display.
9) Select °F or °C Readout - Changes the display readout to
Celsius or Fahrenheit as required.
10) Select Fast Second Stage ON or OFF - (Heat Pump Only)
In the RUN mode, with the Fast Heat feature enabled (FH
Heat On), if the temperature is manually raised by 3°F (2°C)
or more above the actual temperature using the , the
second stage will energize immediately. With FH OFF, the
thermostat will determine the optimum time (approximately
0 to 30 minutes) to use Auxiliary/Second stage heat in
addition to the Heat Pump.
11) Select Filter Replacement Reminder and Set Run
Time Select the “Change Filter” reminder On or OFF. If
selected On, press RUN/HOLD to select the time period
from 25 to 1975 hours in 25 hour increments. In a typical
application, 200 hours (default) of run time is approximately
30 days. After the selected time of blower operation, the
thermostat will display “Change Filter” as a reminder to
change or clean your air fi lter. When “Change Filter” is
displayed, press the RUN/HOLD button to clear the display
and restart the time to the next fi lter change. A selection of
OFF will cancel this feature.
12) Select RUN/HOLD - Exit Menu.
INSTALLER/CONFIGURATION MENU
To prevent compressor and/or property damage, if the
outdoor temperature is below 50
o
F, DO NOT operate
the cooling system.
CAUTION
!
OPERATION
CHECK THERMOSTAT OPERATION
If at any time during testing your system does not operate
properly, contact a qualifi ed service person.
Turn on power to the system.
Fan Operation
If your system does not have a G terminal connection, skip to
Heating System.
1. Move fan switch to ON position. The blower should begin to
operate.
2. Move fan switch to AUTO position. The blower should stop
immediately.
Heating System
1. Move SYSTEM switch to HEAT position. If the auxiliary
heating system has a standing pilot, be sure to light it.
2. Press to adjust thermostat setting to 1° above room
temperature. The Heat Pump system should begin to
operate. However, if the setpoint temperature is fl ashing, the
compressor lockout feature is operating (see Confi guration
menu, item 6).
3. Adjust temperature setting to 4
o
above room temperature.
The auxiliary heat system should begin to operate and the
Flame icon will be fl ashing.
4. Press to adjust temperature setting below room
temperature. The heating system should stop operating.