Installation tips
Consejos de instalacih
l
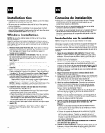
Handle the air conditioner with care. Watch out for the sharp
metal fins on the front and rear coils.
. Be sure your air conditioner does not fall out of the opening
during installation.
l
Do not install the air conditioner in an area where the front
panel will be exposed to heat sources that will raise the panel
surface temperature above 120°F (50°C).
Window installation
NOTE: Be sure the cabinet does not fall out of the window
during installation.
Keep the window lock bracket installed at all times to ensure
that the unit will not fall out of the window. Remove the window
lock bracket only when you wish to remove the air conditioner
from the window.
1.
2.
3.
4.
5.
6.
7.
8.
Remove front panel from the unit. Push down on the top
of the front panel and pull forward. This protects the panel
from damage and makes the air conditioner easier to
handle during installation.
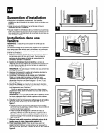
Center air conditioner in the window. Rear of unit must
be raised slightly to posrtion lower rail of air conditioner
behind and up against the back side of the window sill.
See Figure 4.
NOTE: Do not block air entry into the side louvers of the
cabinet.
Firmly lower the window sash behind the top mounting
channel.
Make sure the cabinet has the proper outward slope.
Place a carpenter’s level on the cabinet. There should be a
% bubble (X1’ [6 mm]) tilt toward the outside. See Figure 5.
Pull out sliding curtains. Extend curtains on both sides
until they reach the insides of the window channels. (Pulling
curtains slightly inward allows for easier sliding.)
Mark and drill a pilot hole in each curtain handle before
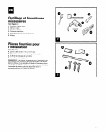
installing round-head screws (A). See Figure 6.
NOTE: If space is a problem, use the pre-drilled holes in the
top flanges of the curtains for the round-head screws.
Install the foam window rail seal (B) and the window
lock bracket (C). See Figure 7.
l
Insert foam rail seal between the top of the lower window
sash and the glass of the upper window.
l
Place the window lock bracket on top of the lower window
sash and against the upper window sash. Drill a starter
hole through the lock bracket and the window sash. Attach
the window bracket with a round-head screw (A).
Seal any small openings around window with gum-type
sealer (D).
Attach the front panel. Place bottom edge on clips and
push the top of the panel down, then up and in. See
Figure 8.
18
l
Manipular con cuidado el acondicionador de aire. Prestar
especial atencion a las aletas de metal afiladas en 10s
serpentines traseros y delanteros.
l
Asegurese de que su acondicionador de aire no se caiga
fuera de la abertura durante la instalacion.
l
No instalar el acondicionador de aire en un espacio donde el
panel delantero estara expuesto a fuentes de calor que
elevaran la temperatura de la superficie del panel a mas de
50°C (120°F).
Instalacih en la ventana
NOTA: Asegurese de que la caja metalica no se caiga
fuera de la ventana durante la insolation.
Mantenga instalado en todo moment0 el soporte de bloque de
la ventana a fin de asegurase que el artefacto no se caera
fuera de la ventana. Retire el soporte de bloqueo de la ventana
solamente cuando desee sacar el acondicionador de aire de la
ventana.
1.
2.
3.
4.
5.
6.
7.
8.
Sacar el panel delantero del artefacto. Empujar hacia
abajo en la parte superior del panel delantero y tirar hacia
adelante. Esto evita que se dafie el panel y permite que el
acondicronador de arre puede ser manipulado con mayor
facilidad durante la instalacion.
Centre el acondicionador de aire en la ventana. La parte
trasera del artefacto debe ser levantada levemente para
colocar el riel inferior del aire acondicionado detras y contra
la pane de atras de la batiente de la ventana. Ver Figura 4.
NOTA: No bloquee la entrada de aire a las rejillas laterales
de la caja metalica.
Bajar firmemente la hoja de la ventana detras de la
canaleta de montaje superior.
Asegurese de que la caja metalica tenga una inclination
hacia afuera adecuada. Colocar el nivel de carpintero en la
caja. Debe tener una inclination hacia afuera de
aproximadamente % burbuja (6mm [1/4”]). Ver Figura 5.
Abrir las cortinas deslizantes. Extender las cortinas en
ambos lados hasta que lleguen a la pane interior de las
canaletas de la ventana. (Si tira las cortinas ligeramente
hacia el interior se deslizaran mejor.)
Marque y taladre un agujero pilot0 en la manija de cada
cortina antes de instalar 10s tornillos de cabeza redondo
manuales (A). Ver Figura 6.
NOTA: Si existe problema de espacio, use 10s agujeros ya
taladrados en las bridas superiores de las cortinas para 10s
tornillos de cabeza redondo manuales.
lnstalar el sello de espuma del travesano de la ventana
(B) y el soporte de bloqueo de la ventana (C). Ver
Figura 7.
l
Inset-tar el obturador de espuma del travesario entre la
parte superior de la hoja inferior de la ventana y el vidrio
de la ventana superior.
l
Colocar el soporte de bloqueo de la ventana en la parte
superior de la hoja inferior de la ventana y contra la hoja
de la ventana superior. Taladrar un agujero de guia a
traves del sopor-te de bloqueo hacia la hoja de la ventana.
lnstalar el soporte de bloqueo de la ventana con el tornillo
de cabeza redonda (A).
Sellar las pequefias aberturas alrededor de la ventana
con obturador tipo goma (D).
lnstalar el panel delantero. Colocar el borde inferior en 10s
fijadores y empuje hacia abajo la pane superior del panel,
luego hacia arriba y hacia adentro. Ver Figura 8.


