


Contents
PARTS AND FEATURES
BEFOREYOU USEYOUR
AIR CONDITIONER.
Energy Saving Tips
HOW TO START 8, USE
YOUR AIR CONDITIONER.
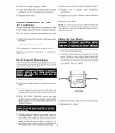
To Start Your Air Conditioner
Using Energy Saver Control
Using Fresh Air/Exhaust Control
Changing Air Direction
CLEANING 81 CARING FOR YOUR
AIR CONDITIONER.
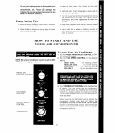
Parts and features
Page
2
2
.3
5
1987 Whirlpool Corporation
Copy your Model and
Serial Numbers here.. .
When you need service or call with a question,
have this information ready.
1. c
omplete Model and Serial Numbers.
To find Model and Serial Numbers remove
the front panel (see page 5). The numbers
are located on a label attached to the
evaporator coil cover near the top of the unit.
2. Purchase date from sales slip.
Copy this information in the spaces below.
Keep this book, your INSTALLATION
INSTRUCTIONS, and your sales slip
together in a handy place.
Model Number
Serial Number
Page
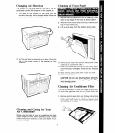
Cleanrng Front Panel
Cleaning Filter
Annual Marntenance
Do-It-Yourself Maintenance
Oiling The Fan Motor
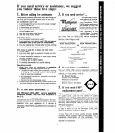
IF YOU NEED SERVICE
OR ASSISTANCE
1. Before Calling For Assistance
2. If You Need Assrstance
3. If You Need Service
4. If You Have A Problem
5. If You Need FSP’
Replacement Parts
Purchase Date
Service Company Name and Telephone Number
5
.5
.6
6
6
7
7
.7
7
7
7
BEFORE YOU USE YOUR
AIR CONDITIONER
Read and carefully follow the “INSTALLATION
INSTRUCTIONS” included with your air conditioner.
It is your responsibility to make sure
that your air conditioner:
l
Has been properly installed.
l
Is the right size for the area you want to cool.
l
Has been properly connected to electrical
supply and grounded. (See INSTALLATION
INSTRUCTIONS.)
l
Is properly used only for the job for which it was
designed.
l
Is not used by anyone unable to operate It
properly.
l
Is properly maintained.
To remove the Consumer Buy Gurde label and energy
ratrng label lrft one edge and pull straight off.
To remove any remaining glue:
1. Rub briskly with thumb to make a ball, then
remove.
-or-
2. Soak area with a liqurd hand dishwashrng
detergent before removing glue as described
in step 1.