


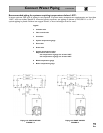

3. A-SGO-7, 8 & 9W — install flue collector hood
(see FIGURE 2):
Obtain gas-tight seal to prevent
possible flue gas leakage and
carbon monoxide emissions, leading to severe
personal injury or death.
a. Thread tinnerman clip on screw so that clip
fits snugly in notch of hold-down lug. Screw
must not turn.
b. Remove paper on sealing rope. Starting at
back section near flue collar, position sealing
rope around top of block with adhesive side to
sections. Do not stretch rope. Make sure rope
ends meet. Trim excess rope.
c. Position flue collector hood on top of boiler
sections and over screws and clips as
shown in FIGURE 2.
d. Install washers and nuts. Tighten nuts
until collector hood makes contact with
tinnerman clip.
e. Back flue outlet boiler — Position flue cap and
strap over opening in flue collector hood.
Make sure rope in cap is in place and in
good condition. Tighten strap to hood with
screws provided.
Top flue outlet boiler — Position flue cap
and strap over opening in back section. Make
sure rope in cap is in place and in good
condition. Tighten strap to boiler with screws
provided in section. Install remaining screws
in holes in flue collector hood.
4. Check level. Shim legs, if needed.
Tankless heater, if used:
1.
SGO-3 through 6W — remove knockout in left
side jacket panel.
2.
Remove tankless heater cover plate and gasket.
3. Install new gasket and tankless heater over
studs around opening. Secure with
3
/8" nuts.
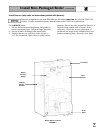
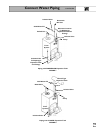
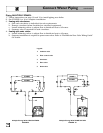
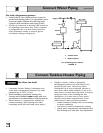
Perform hydrostatic pressure test:
1. See FIGURE 3 and Control Tapping Table on
page 8 to install:
a. Boiler drain.
b. Water pressure gauge (test only). Be sure
gauge can handle test pressure.
c. Air vent in upper tapping.
d. Plugs in remaining tappings.
2. Fill boiler. Vent all air. Pressure test boiler at
1
1
¼2 times working pressure. For boilers split
and reassembled, test between 75 and 85 psig.
Do not leave boiler unattended.
Cold water fill could expand and
damage cast iron, resulting in severe personal
injury, death or substantial property damage.
3.
Check for maintained gauge pressure for more
than 10 minutes. Visually check for leaks if
gauge pressure drops.
4. Drain boiler. Repair leaks if found.
Do not use petroleum-based
compounds to repair leaks.
Damage to system components can result,
causing property damage.
5. Re-test boiler after repairing leaks.
6. Remove pressure gauge, air vent and plugs
from tappings used for controls.
7. Visually check:
a. Sealing rope placement.
b.
Metal-to-metal contact around port openings.
c. Flue collector hood seal.
d. Burner mounting door seal.
Obtain gas-tight seal to prevent
possible flue gas leakage and
carbon monoxide emissions, which can lead to
severe personal injury or death.
7
Install Non-Packaged Boiler
CONTINUED
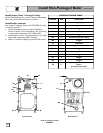
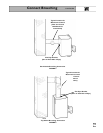
Change from Back Flue Outlet to Top Flue Outlet (Optional)
FIGURE 2
Sealing Rope in
Groove Inside Cap
Flue
Cap
Flue
Cap
Strap
Flue Collector
Hood
Sealing Rope with
Adhesive Tape
Tinnerman Clip
Screw
Nut
Washer