


AQUA PLUS indirect-fired water heaters — Product Manual
Water heater maintenance
(continued)
and their frequencies, including any not listed in the following
paragraphs.
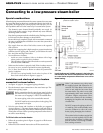
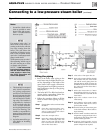
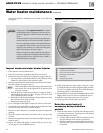
Figure 22 Inspection hatch assembly (hatch cover
shown transparent)
1 Temperature adjustment knob
2 Inspection plate (handhole)
3 Factory wires from thermostat to field wiring terminal block
4 Field wiring terminal block
5 M8 hex nut
6 Inspection plate bracket
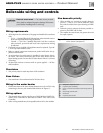
The purpose of the magnesium anode is to reduce
the damaging effects of aggressive water on the wa-
ter heater. Aggressive water will cause the anode to
erode.
The anode must be inspected at least annually to de-
termine whether a new anode should be installed.
Severe or rapid deterioration of the anode indicates
very aggressive water. If this occurs, have the water
tested to verify whether it is within the limits given
under “Operating restrictions,” page 3.
Failure to inspect the anode regularly and replace if
necessary could result in damage to the water heater,
causing possible severe personal injury, death or
substantial property damage.
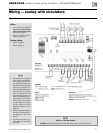
Inspect anode and water heater interior
1. Close domestic water isolation valves.
2. Drain the water heater completely and allow it to cool off.
3. Remove the inspection hatch cover (Figure 24, page 39, item 8).
a. The temperature control bulb will have to be pulled out of the
immersion well, located in the inspection plate.
4. After the water heater has drained and cooled, remove the inspec-
tion plate (Figure 22, page 26, item 2).
There will be some water remaining in the bottom of the
water heater. This can be siphoned off or removed with
a wet/dry vacuum.
a. Partially unscrew the M8 hex nut (Figure 22, page 26, item 5)
while holding the bracket (Figure 22, page 26, item 6). DO
NOT completely remove the nut.
b. Hold and turn the bracket 90 degrees, being careful not to drop
the inspection plate inside the tank.
c. Remove the inspection plate.
5. Use a work light or flash light to inspect the interior of the tank.
6. Use a plastic scraper if needed to remove any accumulation on the
coil. DO NOT use abrasives or metallic objects.
7. Remove as much sediment as possible through the inspection
opening.
8. Rinse the bottom and remove remainder with a wet/dry shop
vacuum.
9. Remove the magnesium anode cover and anode (Figure 24, page 39,
items 10 and 1).
10. Inspect the anode and replace if needed with part list in (Fig-
ure 24, page 39). See WARNING above.
11. Replace the inspection plate gasket if necessary. Then
re-install the inspection plate. Align the gasket carefully.
DO NOT over-tighten the bolt. This could damage or
extrude the gasket, or distort the plate.
12. Re-install the access cover hatch and tighten the four M8
Phillips-head screws. Do not over-tighten the screws.
13. Refill the water heater and restore to operation.
14. Verify operation of boiler and water heater.
Drain the water heater if
necessary during shutdown
periods
1. Drain the water heater if it will be shut off and exposed
to freezing temperatures. Freezing water will expand
and may damage water heater.
a. If boiler water contains sufficient antifreeze, then
only the domestic water needs to be drained.
b. If boiler water does not contain sufficient antifreeze,
then the boiler water and the domestic water must
be drained.
Part number GL-E223-ADOC 0311
26