


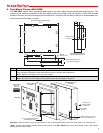

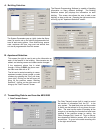

0.875" Diameter
Knockout
Mounting Ring
(included)
AES-2000
The rough-in box
should be framed
into the wall.
Hinge
(8) Screws (included) for mounting
the ring to the rough-in box.
(3) Screws (included) for mounting
the AES-2000 to the ring
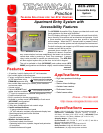
VIKING
©
Hudson, WI
LETTERS
NAMES
CALL/HANG
-UP
EZ
TM
HELP
VOLUME
TTY
Steel Rough-In Box
(included)
Sealant
AUDIO
* Optional Braille
"Audio" label
(included)
I
I
n
n
s
s
t
t
a
a
l
l
l
l
a
a
t
t
i
i
o
o
n
n
A. Flush Mount Chassis (AES-2000F)
The AES-2000F comes with a zinc-plated steel rough-in box and a black powder-painted steel mounting ring. The
rough-in box is meant to be framed into the wall. Make sure the outer edge of the box is within 1/4 inch of the finished
surface of the wall, but not protruding past the surface level. Knockouts are provided in the box to accommodate con-
duit entrance from the sides or bottom.
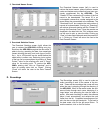
12.25"
9.75"
1.25"
0.45"
3.625"
7.25"
1.25"
2.5"
1.25"
0.45"
1.26"
4.87"
9.74"
(8) 0.187"
Diameter Holes
0.875" Diameter Knockout
0.875" Diameter
Knockout
Bottom View (same as Top
View minus Knockout)
Right Side View (same as
Left Side minus Knockout)
Front View of Steel Rough-In Box
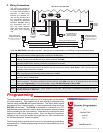
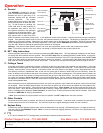
Step 1. After the wall is finished, the mounting ring can be screwed to the rough-in box.
Step 2. Once the mounting ring is secure, the front panel of the AES-2000S can be fastened to the ring using the 3 screws and
nuts provided by aligning the hinge with the three holes on the right side of the frame.
Note: Make sure the key lock is in the open position.
Step 3. Insert the screws and tighten the nuts firmly.
Note: Be careful not to damage the foam gasket around the back edge of the panel.
Important: If the enclosure is to be mounted outdoors, use an appropriate sealant around the outer edge of the mounting ring.
* Note: To help steer visually impaired visitors to the location of the EZ™ HELP button, the optional Braille “Audio” label may be
adhered above the push button.
3.