


1. STOP! Read the safety information on the
previous page.
2. Set the thermostat to lowest setting.
2. Turn off all electrical power and open the
access door.
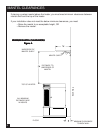
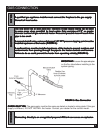
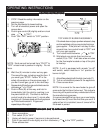
3. Push in gas control (B) slightly and turn clock
wise to "OFF".
5. Push "ON / OFF" switch to "OFF" position.
NOTE: Knob cannot be turned from "PILOT" to
"OFF" unless knob is pushed in slightly. Do not
force.
6. Wait five (5) minutes to clear out any gas.
Then smell for gas, including near the floor. If
you smell gas, STOP! Follow "B" in the
safety information on the previous page. If
you don't smell gas, go on to the next step.
7. Depress knob (B) and turn gas control knob counter
clockwise
to "Pilot".
8. Push in knob (B) all the way and hold in.
Immediately light the pilot by pushing in on
the piezo button (A). Continue to hold the
control knob in for about one (1) minute after
the pilot
is lit. Release knob and it will pop back
up. Pilot should remain lit. If it goes out,
repeat steps 4 through 8.
OPERATING INSTRUCTIONS
TOP VIEW OF BURNER ASSEMBLY
13
If the knob does not pop up when released, stop
and immediately call your service technician or
gas
supplier. If the pilot will not stay lit after
several tries, turn control knob to "OFF" and
call your gas supplier.
9. Turn valve knob clockwise to "ON".
10. Wait about one minute then turn burner
switch (D) to "ON". It will take a few minutes
for the thermopile located on top of the pilot
to heat up.
NOTE: If unit is equipped with remote "on-off"
wall switch, switch must be in "on" position for
burner to light.
11. Adjust flame height with the high-low knob (C).
12. Turn on all electrical power to the appliance.
13. Close access door.
NOTE: It is normal for the new heater to give off
some odor the first time it is burned. This is due to
the curing of the paint and any undetected oil from
the manufacturing process.
It is recommended that you burn your new heater
for at least two (2) hours the first time you use it. If
optional fan kit is installed, leave it turned off for
the break in period.
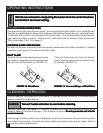
LIGHTING INSTRUCTIONSLIGHTING INSTRUCTIONS
LIGHTING INSTRUCTIONSLIGHTING INSTRUCTIONS
LIGHTING INSTRUCTIONS
1. Open access door.
2. Turn switch (D) to "OFF"
3. Unplug all electric power if service is to be performed.
4. Push in gas control knob slightly and turn clockwise to the "OFF" position.
5. Close access door.
TURN OFF GAS TO APPLIANCETURN OFF GAS TO APPLIANCE
TURN OFF GAS TO APPLIANCETURN OFF GAS TO APPLIANCE
TURN OFF GAS TO APPLIANCE
C
A
B
D