


7
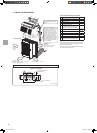
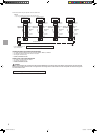
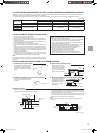
Fig. 1 Fig. 2
Fig. 3 Fig. 4
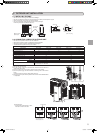
Fig. 5 Fig. 6
3. FLARING WORK AND PIPE CONNECTION
3-1. FLARING WORK
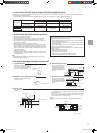
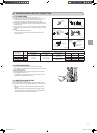
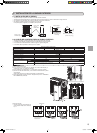
Pipe diameter
[mm(inch)]
Nut
(mm)
A[mm
(inch)] Tightening torque
Clutchtypetool
for R410A
Clutch
typetool
for R22
Wingnuttypetool
for R22
N•m kgf•cm ft·Ib
ø6.35(1/4) 17
0 to
0.5
(0.to0.02)
1.0 to 1.5
(0.04to0.06)
1.5 to 2.0
(0.06to0.08)
13.7 to 17.7 140 to 180 10 to 13
ø9.52(3/8) 22 34.3 to
41.2 350 to 420 25 to 30
ø12.7(1/2) 26
2.0 to
2.5
(0.08to1.0)
49.0 to 56.4 500 to 575 36 to 42
ø15.88(5/8) 29 73.5 to
78.4 750 to 800 54 to 58
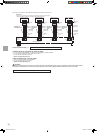
Tilted Uneven Burred
Good
No good
Burr
Copper pipe
Spare reamer
Pipe cutter
Smooth all
around
Even length
all around
Inside is shin-
ingwithout
any
scratches.
Flare nut
Die
Copper pipe
Clutchtype
Flaring tool
Wingnuttype
3-2. PIPE CONNECTION
• Fastenarenutwithatorquewrenchasspeciedinthetable.
• Whenfastenedtootight,arenutmaybrakeafteralongperiodand
cause refrigerant leakage.
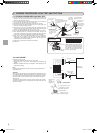
Outdoor unit connection
Connect pipes
to stop valve pipe joint of the outdoor unit in the same
manner applied for indoor unit.
• For tightening, use a torque wrench or spanner and use the same
tightening torque applied for indoor unit.
3-3. INSULATION AND TAPING
1)Coverpipingjointswithpipecover.
2)Foroutdoorunitside,surelyinsulateeverypipingincludingvalves.
3)Usingpipingtape(E),applytapingstartingfromtheentryofoutdoor
unit.
•Stop
theendofpipingtape(E)withtape(withadhesiveagentat-
tached).
• When
piping have to be arranged through above ceiling, closet or
wherethetemperatureandhumidityarehigh,windadditionalcom
-
merciallysold
insulationtopreventcondensation.
Copper
pipe
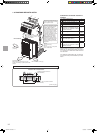
1)Cutthecopperpipecorrectlywithpipecutter.(Fig.1,2)
2)Completelyremoveallburrsfromthecutcrosssectionofpipe.(Fig.3)
•Puttheendofthecopperpipetodownwarddirectionasyou
remove burrs in order to avoid to let burrs drop in the piping.
3)Removearenutsattachedtoindoorandoutdoorunits,thenputthem
on pipe having completed burr removal. (Not possible to put them on
afteraringwork.)
4)Flaringwork(Fig.4,5).Firmlyholdcopperpipeinthedimension
shown in the table. Select A mm from the table according to the tool
youuse.
5)Check
•ComparethearedworkwithFig.6.
•Ifareisnotedtobedefective,cutoffthearedsectionanddo
aringworkagain.
SG79Y871H02.indb 7 9/7/2007 1:09:41 PM