


10
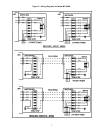
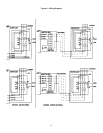
The MP600M is wired directly from the power source
with 20 amps minimum, service utilizing 3 wire grounded
cable, (115-208-230-460-575/60/3) for single 208-
230/60/1, phase service and 4 wire grounded cable for 3
phase service, routed through appropriate conduit (See
figure 5 wiring diagram). All wiring must be connected in
accordance with local electrical codes.
The conduit is connected to the cabinet junction box, or
motor starter enclosure on the top-right front corner of
unit.
OPERATION
To start the air cleaner, close the access door and
activate the ON-OFF control switch to ON. The blower
motor should start.
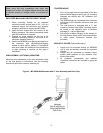
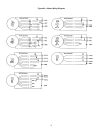
Blower Rotation (3 phase power only)
By looking down through the MP600M discharge grille
confirm blower rotation agrees with rotation label on
motor mount. If rotation is incorrect reverse two (2) input
power leads connections in the junction box, switch box
or motor starter enclosure. Again verify correct blower
rotation.
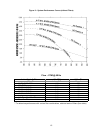
FILTER CHANGE (MINI-HELIC GAUGE)
INDICATOR (OPTIONAL) OPERATION
Change filter according to the pressure drop across the
filter. A minihelic gauge with a range from 0-5” water
column is optional for reading filter pressure.
Estimated Filter Change Pressure
Main Filter Both Filters Change Pre-filter Recommended Final
Estimated Estimated
95% 1.8”w.c. 3.1”w.c.
HEPA 1.8”w.c. 3.1”w.c.
NOTE:
These readings will vary slightly due to altitude and
temperature.
Upon installation of the unit, note the initial pressure
reading and record in the table above. Check daily and
replace pre-filter at the reading shown in the table.
Pressure should return to near the initial pressure
reading. When the pressure reading, with new pre-filter,
shows little improvement (less than 0.1”) allow unit to run
until recommended final pressure is reached. At that
point, both pre-filter and main filter should be replaced.
Impinger models will have greater pressure initially than
standard models.
Once a pattern is established, the pre-filters can be
replaced on a calendar basis with the main filter being
replaced when the gauge reads “Recommended Final”
in the Table. For example, if the unit takes 6 weeks to go
from initial reading to 1.8” w.c., the pre-filter would then
be replaced every 6 weeks until no change occurred in
the pressure reading when the pre-filter is replaced. At
that point, the unit would be allowed to run until 3.1” w.c.
and both filters replaced.
NOTE:
The unit can continue to run beyond the 3.1” w.c.
pressure reading; however, airflow will be reduced
further.
CAUTION:
To check internal components, disconnect power source
to unit to prevent accidental shock.
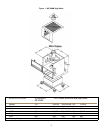
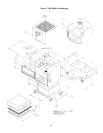
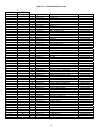
MAINTENANCE
Precision equipment will require a minimum amount of
maintenance to keep it in operating condition. You can
perform all normal preventative maintenance. If you are
unfamiliar with the terminology used in the in the
following sections, refer to the Parts List (Figure 7-A).
CLEANING AND INSPECTION
Cleaning of Impinger, and inspection and replacement of
pre-filter and main filter.
CAUTION:
Always disconnect the power source before working on
or near any electrical component. If the disconnect point
is out of sight, lock it in the proper position and tag to
prevent unexpected application of power.
1. Turn unit off.
2. Open access door by turning door latches
counter clockwise.
3. Remove filter element, pre-filter and impinger
assembly or pre-filter support.
4. Clean impinger by first rinsing with warm to hot
water, then immerse in a commercial grade
detergent. Trion recommends our specially
formulated Tridex detergent to provide maximum
cleaning efficiency on air cleaning equipment.
For best results, the cleaning solution should be
140ºF to 160ºF. The impinger should be soaked
in the solution for 1½ to 2 hours (longer if
extremely dirty).
NOTE:
Using non-factory approved detergents can cause
damage to the metal surface.
5. While impinger is soaking, make the following
inspections: