


SXIH-SVX01B-EN 7
Installation
pre-installation
considerations
Installation
Pre-Installation Considerations
Checklist
The following checklist gives an overview
of the recommended pre-installation
considerations. Follow the procedures in
this section to ensure installation is
complete and adequate for proper unit
operation. Verify this checklist is complete
before beginning unit installation.
Verify the unit size and tagging with the
unit nameplate to ensure the correct
unit is received.
Inspect the unit for possible shipping
damage and make any necessary
claims with the freight delivery
company immediately.
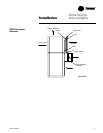
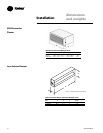
Before installing the unit, remember to
allow minimum recommended
clearances for routine maintenance and
service. Refer to unit dimensions and
clearances on submittals or in the
Dimensions and Weights section.
Verify the unit is configured properly
prior to beginning unit installation.
Make proper acoustic considerations
before installing unit. Do not install unit
near sound-senstive locations.
Allow adequate space for service and
operating clearances. Reference
“Service Access” section on this page.
Make provisions for correct supply
power and note electrical connection
knockouts locations on the unit
submittals or in the Dimensions and
Weights section.
Ensure the unit installation location is
level.
Receiving and Handling
Shipping Package
Integral air-cooled units ship assembled
on skids. Units ship in the unitary
configuration, assembled, piped, and
charged with refrigerant.
Receiving Checklist
Complete the following checklist
immediately after receiving unit
shipment to detect possible shipping
damage.
Verify that the unit nameplate data
corresponds to the sales order and bill
of lading (including electrical data).
Visually inspect the unit exterior for
physical signs of shipping damage or
material shortages.
If a unit appears damaged, inspect it
immediately before accepting the
shipment. Remove access panels and
check for interior component damage.
Make specific notations concerning the
damage on the freight bill. Do not
refuse delivery.
Report concealed damage to the
freight line within the allotted time after
delivery. Verify with the carrier their
allotted time to submit a claim.
Note: Failure to follow these procedures
may result in no reimbursement for
damages from the freight company.
Do not move damaged material from
the receiving location. It is the receiver’s
responsibility to provide reasonable
evidence that concealed damage did
not occur after delivery.
Do not continue unpacking the
shipment if it appears damaged. Retain
all packaging. Take photos of damaged
material if possible.
Notify the carrier’s terminal of the
damage immediately by phone and
mail. Request an immediate joint
inspection of the damage by the carrier
and consignee.
Notify your Trane representative of
the damage and arrange for repair.
Have the carrier inspect the damage
before making any repairs to the unit.
Unit Storage
Take precautions to prevent condensate
from forming inside the unit’s electrical
compartments and motors if the unit is
stored before it is installed.
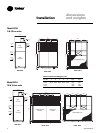
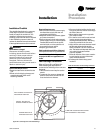
Service Access
Maintain adequate clearances around
and above the unit to ensure proper unit
operation and allow sufficient service
access. Trane recommends 36-inches
service access on all sides of the unit.
WARNING
Hazardous voltage!
Disconnect all electric power,
including remote disconnects before
servicing. Follow proper lockout/
tagout procedures to ensure the
power can not be inadvertently
energized. Failure to disconnect
power before servicing could result in
death or serious injury.
Acoustic Considerations
Before determining the final unit
installation site, remember that proper
unit placement is critical in reducing
transmitting sound levels to the building.
The ideal time to make provisions to
reduce sound transmissions is during
the design phase. The most economical
means of avoiding a potential acoustical
problem is to place units in areas that are
not acoustically sensitive.
Unit Location
Install the unit in a dry, indoor area
between 50 and 115°F. Choose a location
where sound levels, airflow and vibration,
commonly associated with heavy-duty
commercial equipment, will not be
objectionable to occupants. In multiple
unit installations, separate the individual
units and stagger their location from floor
to floor so as not to starve units for air
and not to discharge warm condenser air
from one condenser into the intake of
another condenser. Place thermostats, air
supplies and returns so that the individual
unit will operate within its zone.
Installation Preparation
Before installing the unit, perform the
following procedures to ensure proper
unit operation.
1. Verify the installation location is level.
To ensure proper unit operation, install
the unit level (zero tolerance) in both
horizontal axes. Failure to level the unit
properly can result in condensate
management problems, such as
standing water inside the unit. Standing
water and wet surfaces inside units can
result in microbial growth (mold) in the
drain pan that may cause unpleasant
odors and serious health-related indoor
air quality problem.
2. Allow adequate service and code
clearances as recommended in the
Service Access section.
3. Position the unit in its final location.
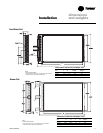
Unit Placement
Install the unit on a firm, level surface.
Installing Optional Accessories
Before installing ductwork, install
accessories on unit.