


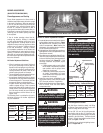
IMPORTANT
Do not use abrasive cleaners
on glass. Never clean the glass
when it is hot.
• During start-up, it is normal for condensa-
tion to form on the inside of the glass (this
condensation and fog will usually disappear
in a few minutes). The moisture can cause
lint, dust and other airborne particles to cling
to the glass surface.
• Initial curing of the high temperature paint
and burning off of lubricants used in the
manufacturing process may result in a film
on the glass.
• A white coating may form on the glass as a
result of impurities and minerals in the fuel.
It is recommended that the glass be cleaned
two or three times during each heating season,
depending on the circumstances present. The
following cleaning solutions are approved for use
to clean glass:
• Non-ammonia based household cleaner
• 50%-50% mix of white vinegar & water
• Gas fireplace/stove glass cleaner
Inspect Glass Gasket - Visually inspect the
gasket on the backside of the glass enclosure
panel. The gasket surface must be clean, free
of irregularities and seated firmly.
Inspect Venting System
The appliance and venting system should be
thoroughly inspected before initial use and at
least annually by a qualified service technician
(inspection should include ensuring that exhaust
or intake passages are unobstructed and vent
components are properly assembled and not
damaged). If the venting system is disassembled
for any reason, a qualified service technician
should follow vent installation instructions for
proper reassembly and proper sealing of the
venting system components. However, more
frequent periodic inspections and cleanings
should be performed by the homeowner.
Clean Logs And Burner
Carefully remove the logs (use care when han
-
dling the fiber logs, as they become quite fragile
after curing). Vacuum out any foreign matter
(lint, carbon, etc). on the burner. Ensure the
burner ports are “open.” Remove any carbon
deposits from the under side of the logs using
a vacuum cleaner, or a soft bristled brush (i.e.
paint brush). Note: Improper positioning of
logs can create carbon build-up and will alter
the performance of the appliance.
Replacing Logs -
If the logs become damaged by accident or
improper handling and need replacement, use
only the proper replacement logs from manufac
-
turer (see Page 23 for ordering information).
WARNING
Label all wires prior to discon-
nection when servicing controls.
Wiring errors can cause improper
and dangerous operation. Verify
proper operation after servicing.
Re-Install Embers, Logs and Volcanic Stone
- Carefully follow placement instructions on
Pages 8 to 10 ). All logs should fit onto cor
-
responding pins and/or log stoppers. This will
ensure a proper flame and safe combustion.
Inspect Wiring
Refer to wiring diagrams on Page 12.
6
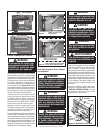
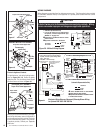
Manually-Reset Spill Switch (limit disc)
ALLOW APPLIANCE TO COOL COMPLETELY
BEFORE ACCESSING AND RESETTING
This appliance is equipped with a manually-reset
blocked flue spill switch (limit disc). Refer to
Figure 6 for the location. If, during appliance
operation, the flame goes out (independently of
the burner on/off wall switch), it may be due to
the operation of this spill switch (limit disc).
First
allow the appliance to cool. Remove top louver
panel. Then reset the spill switch (limit disc) by
pushing the red reset button, located between the
wire terminals, on the back of the switch.
The appliance should then relight and remain
lit. Reinstall top louver panel. If the appliance
does not relight,
turn off the appliance and call
for a qualified service technician.
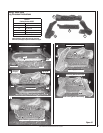
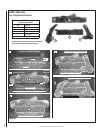
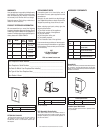
To replace the blocked flue spill switch (limit
disc) refer to Figures 6, 7 & 8:
NOTE -
This procedure should only be per-
formed by a qualified service technician.
Important -
Turn electrical power off before
beginning this procedure.
1 - Remove the top louvered panel and the
bottom control compartment panel (see
Figure 1 on Page 4
). Remove the glass
enclosure panel (see
Removing Glass
Enclosure Panel on Page 7).
2 - Remove the lintel securing screws (3) and
then remove the lintel. One of the lintel cabinet
top holes is shown in Figure 7)
.
3 - Remove the scoop securing screws (3) and
then remove the scoop. See Figure 7.
4 - Remove the spill switch bracket securing
screws (2), and pull the switch/bracket
assembly, with low voltage wires attached,
through the side panel slot into the firebox.
See Figure 8
.
5 - Replace the spill switch.
6 - Reinstall the switch/bracket assembly.
7 - Reinstall the scoop and lintel.
8 - Reinstall the glass enclosure panel.
9 - Re-Install the bottom control compartment
access door.
10 - The appliance should then relight and
remain lit. If this does not occur, check
unit for a blocked flue condition.
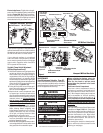
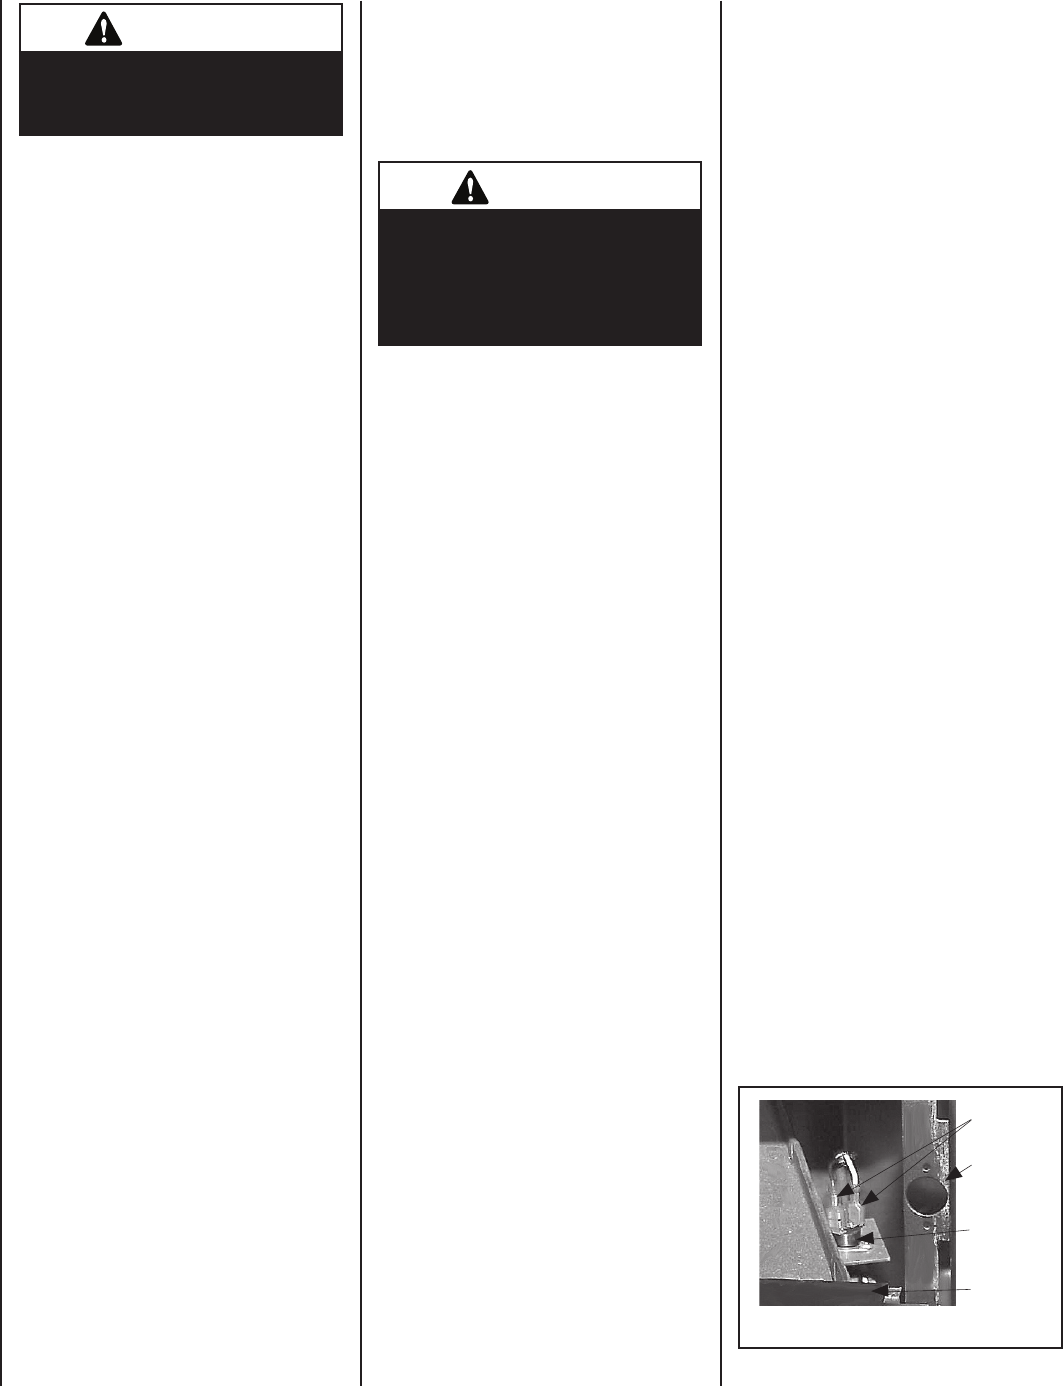
Spill Switch (Blocked Flue Safety Limit)
Location - See Figures 6, 7 & 8. Inside View
of Firebox - Top/Right Side Intersection
Figure 6
Wire
Terminals
Cabinet
Corner
Back of Spill
Switch (high
limit disc)
Door
Frame
Inspect and clean all wire connections. Ensure
that there is no melting or damage. Inspection
should include:
• Terminals at the Valve
• OFF/ON Switch
• (Optional Control Switch) OFF/ON Rocker
Switch, Remote Control or Remote Wall
Switch Kit
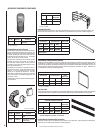
Inspect Burner Flame Appearance
Ensure that the burner flame appearance
resembles the flame shown in Figure 15 and
as described in
Flame Appearance and Sooting
on Page 11
. The Homeowner must contact
a qualified service technician at once if any
abnormal condition is observed.
Small Area Paint Touch-up
The finish of the appliance is a high qual
-
ity powdercoat. Only use factory supplied
powdercoat paint kit for touch-ups. Paint is
available at your local authorized
Superior
Hearth Products dealer, cat. no. 90L74. Never
attempt to paint a hot fireplace.
Do not attempt to repaint the appliance until the
finish is completely cured (see Burn-In Period
on Page 4
). If the surface later becomes stained
or marred, it may be lightly sanded and touched
up with spray paint.
VENT SPILLAGE TEST
After appliance installation, then periodicly
thereafter, perform this spillage test to verify
that proper venting conditions exist:
1 - Ensure glass enclosure panel is properly
installed.
2 - Close all doors and windows in the room.
Turn on all exhaust fans in the house.
3 - Light the appliance.
4 - Wait 15 minutes.
5 - To check for venting action, start by holding
a smoke producing device within an inch
of one edge (side edge, not top or bottom
edge) of one glass enclosure panel. The
smoke should be drawn toward the edge
of the glass enclosure panel. Continue the
test by moving the smoke producing device
along the entire length of both side-edges
of the glass door.
6 - If the smoke is not drawn towards the edges
of the glass door, turn off the appliance and
call a qualified service technican.