


SonicWALL NSA 5000/4500/3500 Getting Started Guide Page 43
Configuring NAT Policies
NAT policies allow you the flexibility to control Network Address
Translation based on matching combinations of Source IP
address, Destination IP address and Destination Services.
Policy-based NAT allows you to deploy different types of NAT
simultaneously. The following NAT configurations are available
in SonicOS Enhanced:
• Many-to-One NAT Policy
• Many-to-Many NAT Policy
• One-to-One NAT Policy for Outbound Traffic
• One-to-One NAT Policy for Inbound Traffic (Reflexive)
• One-to-Many NAT Load Balancing
• Inbound Port Address Translation via One-to-One NAT
Policy
• Inbound Port Address Translation via WAN IP Address
This section describes how to configure a Many-to-One NAT
policy. Many-to-One is the most common NAT policy on a
SonicWALL security appliance, and allows you to translate a
group of addresses into a single address. Most of the time, this
means that you are taking an internal “private” IP subnet and
translating all outgoing requests into the IP address of the
SonicWALL security appliance WAN port, such that the
destination sees the request as coming from the IP address of
the SonicWALL security appliance WAN port, and not from the
internal private IP address.
For other NAT configurations, see the SonicOS Enhanced
Administrator’s Guide.
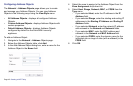
An example configuration illustrates the use of the fields in the
Add NAT Policy procedure. To add a Many-to-One NAT policy
that allows all systems on the X1 interface to initiate traffic using
the SonicWALL security appliance’s WAN IP address, perform
the following steps:
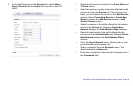
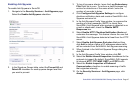
1. Navigate to the Network > NAT Policies page. Click Add.
The Add NAT Policy dialog box displays.
2. For Original Source, select Any.
3. For Translated Source, select WAN Interface IP.
4. For Original Destination, select Any.
5. For Translated Destination, select Original.
6. For Original Service, select Any.
7. For Translated Service, select Original.
8. For Inbound Interface, select X1.
9. For Outbound Interface, select X1.
10. For Comment, enter a short description.
11. Select the Enable NAT Policy checkbox.
12. Leave Create a reflexive policy unchecked.
13. Click Add.
This policy can be duplicated for subnets behind the other
interfaces of the SonicWALL security appliance – just replace
the Original Source with the subnet behind that interface,
adjust the source interface, and add another NAT policy.