


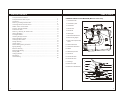
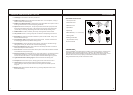

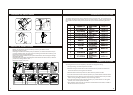
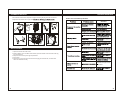

ACCESSORIES
Standard Accessories
1.All Purpose Foot
2.Satin Stitch Foot
3.Blind Hem Foot
4.Spool Base
5.Spool Cap
6.Metal Bobbins (2 + 1 in machine)*
7.Darning Plate
8.Package of Needles
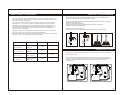
*IMPORTANT!
®
Use only SINGER brand metal Class 15 bobbins in this sewing machine. The tension on
the bobbin thread is operated magnetically. Therefore, the metal bobbin is required.
Using transparent or plastic bobbins, though they may seem to fit in the machine, will not
allow the machine to function properly, and the stitch result will be unsatisfactory.
Using metal bobbins will provide correct stitch results.
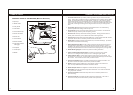
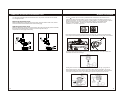
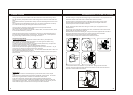
PRINCIPAL PARTS AND WHAT THEY DO
Feed Dogs move the fabric under the presser foot.
Bobbin Cover Plate sits over the bobbin and bobbin case. It is transparent, making it
easier to monitor the thread supply.
Bobbin Cover Release Button is located to the right of the bobbin cover plate. Press it
to the right to release the cover when replacing the bobbin.
Spool Pin holds the thread spool. The spool pin holder fits onto the spool pin to allow
thread to unwind without tug or drag. The spool pin can be used in either of two ways
(horizontally or vertically), depending on the size of the thread spool being used.
Bobbin Winder is used for smoothly and evenly winding thread onto the bobbin.
Carry Handle is built-in, making it easy and convenient for transporting the machine.
Hand Wheel controls the movement of the take-up lever and the needle. Always turn
the hand wheel toward you.
Foot Controller Input is located at the back of the machine. The foot controller cord
must be plugged into this input before starting to sew.
Foot Controller is used to start the machine sewing. Step on the controller to begin
sewing and remove your foot from the controller to stop sewing.
Power Cord Socket at the back of the machine is where the power cord is inserted in
order to provide power to the machine.
Power Cord has one end that connects into the power cord socket and another end that
is connected to a main power supply.
Presser Foot Lifter is located inside the “C” area of the machine. Use the lever to raise
and lower the presser foot. The foot is raised before threading the machine and to
remove work from the machine. Lower the presser foot lifter before beginning to sew.
Light Switch & Built-in Sewing Light are used to illuminate the sewing area.
Faceplate houses the take-up lever, sewing light, tension mechanism and more.
Thread spool is used to hold and direct the thread into the tension disks.
There is a diagram at the top of the machine indicating where the thread slips into
the guide.
Bobbin case holds the bobbin thread securely, providing adequate tension on the
thread while sewing.
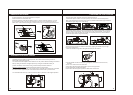
17.
18.
19.
20.
21.
22.
23.
24.
25.
26.
27.
28.
29.
30.
31.
32.
(Style 2020/Size 14/90)
9.Instruction Book
9
8
8
7