


8 9
b
c
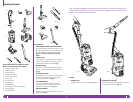
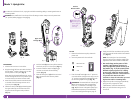
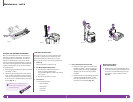
Upper Cord
Storage Wrap
To reduce the risk of electric shock, unplug the unit before assembling, adding or removing attachments or
converting modes.
WARNING: The On/Off switch is on the top of the Lift-Away
®
canister. Always ensure the power is OFF
(“O” position) before plugging and unplugging.
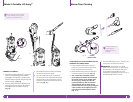
TO ASSEMBLE:
1 Place the floor nozzle on a level surface.
2 Align the tube of the floor nozzle with the tube on
the Lift-Away
®
canister and lower until you hear
the two pieces click into place. (Fig. 9)
When attaching the motorized floor brush, ensure
that the latching mechanism is fully locked in place
to ensure electrical connection has been made.
3 Attach the end of the extension wand to the tube
on the back of the Lift-Away
®
canister until it
clicks into place. (Fig. 10)
4 Slide the accessory holder (a) positioned opposite
the upper cord wrap, over the extension wand.
Align the tab with the groove and push down.
(Fig. 11)
5 Push the handle (b) onto the top of the extension
wand until you hear it click into place. (Fig. 11)
6 Insert the end of the stretch hose (c) into the
connector on the back of the Lift-Away
®
canister. (Fig. 11)
7 Store the dusting brush (d) and the crevice tool
(e) on the mounts of the accessory holder.
(Fig. 11)
Fig. 9 Fig. 10
Fig. 11
a
d
e
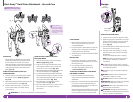
Mode 1: Upright Vac
TO USE:
1 Rotate the cord release to quickly release the
power cord.
2 Secure the power cord in the cord hook.
= Brush Roll ON
= Bare Floor
= OFF
3 Press the On/Off switch (a) to the “I” position to
vacuum bare floors (straight suction only) or to the
“II” position to engage the motorized floor brush
(for vacuuming carpets and rugs). (Fig. 12)
IMPORTANT: The motorized brush indicator light
(b) will illuminate green when motorized floor
brush is on, or red if there is a blockage or jam.
(Fig. 12) This feature is designed to protect your
Lifetime Belt that powers your motorized floor
brush. See Checking for Blockages on page 15.
4 Gently press the floor nozzle down with your foot
while you grasp the handle and tilt it back towards
you. (Fig. 13)
NOTE: The rotating brush on the motorized
floor brush will not spin unless the nozzle is flat
against the floor and the handle is tilted back.
5 Due to the huge suction power of this
vacuum, it may become necessary at
times to adjust the suction release (c) on
the handle. (Fig. 11) If the vacuum seems
difficult to push or pull or if it is lifting
up area rugs, adjust the suction release
by rotating the collar 90° counterclockwise
to open the valve. Rotate the collar
clockwise to close the valve when you need
high suction and for vacuuming floors.
6 Empty dust cup after vacuuming and periodically
during use when it appears full. (See
“Maintenance” section for instructions.)
7 When you are finished vacuuming, turn the
vacuum off.
Fig. 13
Fig. 12
b
Suction
Release Collar
a
Release suction
for easier push &
pull on high pile
carpets and
area rugs.
c