


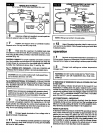

SPLASH INSIDE HUMIDIFIER:
This humidifierdepends on the difference ofair pressu re between
the supply air plenum and the return air plenum to propel air
through the humidifier.Some furnaces have higher pressures than
others,This could result in air traveling at high speed through the
humidifier. This can cause droplets of water to be picked up and
splashed against the inside of the humidifier case. Eventually a
coating of lime will build up. It could, in extreme cases, cause
leaking of water from the humidifier.
TO REDUCE SPLASH:
Partially close the damper located in the collar on the return air
plenum. Some experimenting may be necessary to find the proper
setting.
maintenance
CLEANING AND SERVICE INSTRUCTIONS:
CAUTION: Before performing service, inspection, or
maintenance:
[] 1 Turnoffelectricity at furnace, humidifier, and humidistat.
2 Turn offwater at humidifier saddle valve.
3 Wear safety glasses.
This humidifier isan appliance that evaporates water in largequan-
tities.The dissolved minerals normally found intap water invary-
ing degrees are left as lime deposits on the media pad and other
parts in contact with the water. Deposit build-up will reduce hu-
midifier output. Annual cleaning and replacement of the media
pad is recommended. Since water conditions vary, itmay be nec-
essary to service more or less often. Establish your own service
schedule. Ease ofservice has been foremost inthe design of this
humidifier following the steps below:
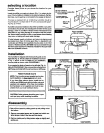
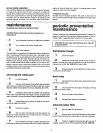
servicing the media pad
1 Lift Offfront panel.
2 Remove media pad by liftingbottom edge up slightly
and pivoting out. Inspect and replace if badly b_ocked with mineral
deposits. (Media Pad available from Seam, Stock No. 42-14711 .)
3 If necessary, cleaninsideof humidifier case (especially
lower drain area) with water and vinegar solution, detergent and
water, or Sears All-Purpose Humidifier Cleaner, Stock No. 42-14713.
4 Install media pad by sliding top edge up and pivot-
ing bottom edge into position.
[] 5 Replace front panel.
6 Turn on water and electricity and test operation by
observing if water is flowing to drain while furnace is running and
humidistat is set to =test" position.
[] 7 Set humidistat according tooutdoor temperature as
instructed on operating instruction label. Unit is back in operation.
periodic preventative
maintenance
Periodic inspection and preventative maintenance ofthese com-
ponents is important for continued, efficient operation of the hu-
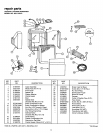
midifier. Refer to exploded view for location of components.
I
CAUTION: Be sure water and electricity are turned off I
as advised above.
I
distribution trough
[] 1 Lift Offfront panel.
[] 2 Loosen the (2) #6 outer screws on top of the hu-
midifier. Remove and clean the distribution trough and pad set.
Replace pad set (Pt. No. 35587901) if badly soiled.
[] 3 Reassemble pad set and distribution trough and se-
cure with the (2) #6 screws.
drain tube
I_ 1 Usingspring hose clamp pliers, expand hose clamp
and remove drain tube.
[] 2 Clear internal lime and calcium deposits by flexing
or striking on hard surface.
[] 3 Flush with water under pressure.
4 Reinstall drain tube and hose clamp.
solenoid water filter
[] 1 Remove water line at solenoid.
[] 2 Remove nylon elbow inletfitting filter/orifice assem-
bly from solenoid valve by unscrewing (turn counter-clockwise).
_i3 Check for clogging by blowing through one end. If
clogged, replace with new fitting assembly, Part No. 05291201.
9