


[] 7 Unwind the rest of the tubing. Take care not to Idnk
it. Run the tubing along flat surfaces tothe humidifier.Support the
tubing as needed to avoid contact with furnace.
[] 8 Closepreviouslyopenedfaucet.Turnon mainwa-
ter supply.Place a pail under the end ofthe tubing.Open the
saddlevalve. Flushthe line.Make sure thereare noleaksalong
the lineor at thevalve.Turnvalveoff.
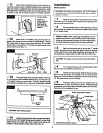
[] 9 Withwater supplytubingcuttothe properlength,
slidetheplasticcompressionnutoverthetubing.Slipbrassinsert
intotheend oftubing.
Check ForLeaks,
Tightenif Necessary._ PlasticTubing
BrassInsert
Valve
Compi'ession
Nut
[] 10 Insertthe tubingend intothe solenoidvalve fitting
asfar as ifwillgoand holditthere,threadtheplasticcompression
nutontothefitting, thentightensecurely,finger tight(nowrench).
Do notovertightennut(Fig. 14).
[] 11 Turnonwatersupplyatsaddlevalve.Checkforleaks
at solenoid valve fitting and plastic compression nut.
I
NOTE: waterwillnotflowthru humidifieruntilelectricalin- I
stallationiscompleted.
I
installation
HUMIDISTAT
The humidiatatisdesignedto mountonthe returnair plenumof
yourfurnace or on an interiorwall ofthe home.The returnair
plenum,however,isthe preferredlocationfor sensingthe ever-
age humiditythroughoutyourhome and isthe locationcovered
byinstallationsteps 1through11.(ifyoudecideonthewallmount
location,thehumidistatcontrolunitmustberemovedand mounted
tothe oppositeside of the plasticbackplateeo it willbe housed
l_aideoftheplasticcover- omitsllaft extana]on- purchaseaddi-
tional low voltage wire and run wire inside of wall to exit hole
withinthe loweropeningofthebackplate.)
NOTE: The humidistat as supplied is assembled for return
air plenum installation (Fig. 16.).
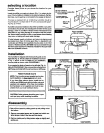
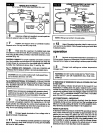
RETURN AIR PLENUM MOUNT
[] 1 LOCATETHE HUMIDISTATon returnair plenum
(Fig, 15). DO NOT install humidistat on supply air plenum.
HUMIDISTATMUST BE MOUNTED AT LEAST 6" UPSTREAM
FROM FLEXIBLE HOSE (OR HUMIDIFIER IF HUMIDIFIER
INSTALLEDON RETURN AIR PLENUM).
-- ._.. I _% /..i -- .1_. I
Humidistat Supply
On Return J,_,.l[... _,._ / Plenum
AirPlenum /I _ I-J'F--_-II
only/ IF
6" t I I
Minimum I A
I
I _ AirFlow J
_Fur"'nac_"
[] 2 HUMIDISTATMOUNTS INA HORIZONTALPOSI-
TION. Peel paperbackingfrom templateand paste it on return
airplenumwherehumidistatistobe mounted.Keep level.
[] 3 Drill118"holes for the four mounting screwsas
shownonthetemplate.
[] 4 cutoutcenterportionoftemplatewithinsolidlines.
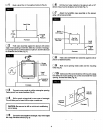
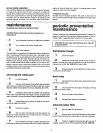
[] 5 After removing paper backing from gasket, apply
gasket around return air plenum opening as indicated on tern-
plate (Fig. 16).
ApplyGasket HereAroundOpening
Backplate
Mounting Plenum
Screws
(4) Opening
_" ControlUnit
I Mounting
Screws(2)
LSheft Extension
7