


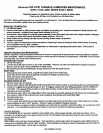
Kenmore 303.14701 FURNACE HUMIDIFIER MAINTENANCE
(APPLY THIS LABEL WHERE EASILY SEEN)
Cleaning frequency is dependent upon mineral content of water supply.
Check every 60 Days until schedule can bd determ_ned.
CAUTION: Before performing service, inspection, or maintenance: Turn off electricity to furnace and humidifier, turn
off water at humidifier saddle valve, wear safety glasses.
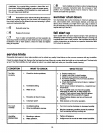
SERVICING THE MEDIA PAD
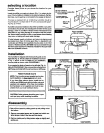
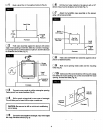
1. Lift off front panel.
2. Remove media pad by lifting bottom edge up slightly and pivoting out. Inspect and replace if badly blocked with
mineral deposits, available from Seam (stock number 42-147tl).
3. If necessary, clean inside of humidifier case (especially lower drain area) with water and vinegar solution, detergent
and water, or Sears All-Purpose Humidifier Cleaner stock no. 42-14713.
4. Install media pad by sliding top edge up and pivoting bottom edge into position.
6. Replace front panel.
6. Turn on water and electricity and test operation by observing if watsr is flowing to drain while furnace is running
and humidistat is set to "test" position.
7. Set humidistat according to outdoor temperature as instructed on operating instruction label. Unit is back in
operation.
PERIODIC PREVENTATIVE MAINTENANCE
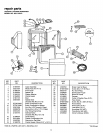
Periodic inspection and preventative maintenance of these components is important for continued, efficient operation
of the humidifier. Refer to exploded view in your owners manual for location of components. CAUTION: Be sure water
and electricity are turned off as advised above.
DISTRIBUTION TROUGH
1. Lift off front panel.
2. Loosen the (2) #6 outer screws on top of the humidifier. Remove and clean the distribution trough and pad set.
Replace pad set (part number 365879-01) if badly soiled.
3. Reassemble pad set and distribution trough and secure with the (2) #6 screws.
DRAIN TUBE
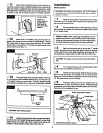
1. Using spring hose clamp pliers, expand hose clamp and remove drain tube.
2. Clear internal lime and calcium deposits by flexing or striking on hard surface.
3. Flush with water under pressure.
4. Reinstall drain tube and hose clamp.
SOLENOID WATER FILTER
1. Remove water line at solenoid.
2. Remove nylon elbow inlet fitting filtedoriflce assembly from solenoid valve by unscrewing (turn counterclockwise).
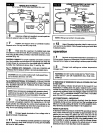
3. Check for clogging by blowing through on end. If clogged, replace with new fitting assembly, Part No. 052912-01.
CAUTION: This special fitting contains a brass filter and flow control orifice which must be in place for proper
operation of your humidifier.
4. Reinstall the nylon elbow inlet fitting filtsdorifice assembly by carefully aligning the fine thread end containing the
flow control orifice in the solenoid valve and screwing in (clockwise) until moderately tight.
5. Reinstall water line.
6. Replace front panel.
7. Turn on water and electricity and test operation by observing if water is flowing to drain while furnace is running
and humidistat is set to "test" position. Check for leaks and tighten fitting as required.
8. Set humidistat according to outdoor temperature as instructed on operation instruction label. Do not leave in "test"
position. Your humidifier should now be ready for many more months of trouble-free operation.
Summer Shutdown
Turn humidistat dial to "minimum setting", close saddle valve, close bypass damper, and clean per above. (As a
reminder, you might want to put a tag or sticker on the unit indicating it has been shut down for the summer and will
require start up in the fall.)
Fall Startup
Open saddle valve and open bypass damper. Test operation by observing if water is flowing to drain while furnace is
running and humidistat dial is set to "test" position. Set humidistat according to outdoor temperature as instructed on
operation instruction label. Unit is back in operation.
PIN 21603801R10-0O