


installation
HUMIDISTAT
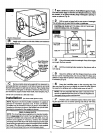
The humidistatis designedto _ount on the cold air plenumof
your furnace or onan interiorwallof the home.The cold air ple-
num, however is the preferredlocationfor sensingthe average
humiditythroughoutyourhome. Select your location and follow
the appropriateinstructions.
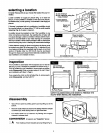
I OTE:THE HUMIDISTATAS SUPPLIED IS ASSEMBLEDFOR COLD AIR PLENUM INSTALLATION(FIG. 20).
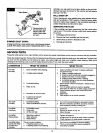
cold air plenum mount (no.20)
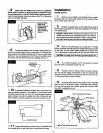
[] 1 Select a locationthat isa minimumof 6" upstream
on cold air plenum (Fig. 19). Peel off paper backing and posi-
tion template supplied,drill four 1/8" diameter holes and cut
out center portionalong solid line. Peel off backing and apply
gasket matedalas indicatedby dashedlines.
I CAUTION: DONOT install humidistat on hot air plenum. I
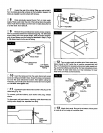
[] 2 Remove knob and cover from humidistat. To remove
cover, place screwdriver blade in slotat side of humidistat and twist.
[] 3 Position humidistat in opening and fasten with four
screws provided.
[] 4 Installshaft extension.Installcoverby snappingonto
backplate. Press knob onto shaft extension.
5 Connect wiring (Fig. 21)_ Plug 24 VAC transformer
into 120 VAC outlet. Do not use existing transformer on furnace.
6 Peel off backing and attach the operating instruc-
tion label to the cold air plenum next to the humidistat.
wall mount (Fig.22)
On ColdAir
Plenum
HotAir
Plenum
6"
Minimum
I I
t
_,Air Flow I
"" _ -- "" _ Fumaca
Apply Gasket Here Around Opening
,Return Air
Plenum
Opening
Knob
DUCT MOUNT
Humid
Electdcal
Disconnect
Humidifier
t
120 VAC Wall Outlet
[] 1 Remove knob end coverfrom humidistat.To remove
cover,placescrewdriverbladeinslotatsideofhumidistatandtwist.
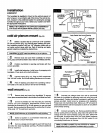
2 Convert humidistat for wall mounting by removing
control unit from backplate. Reassemble control unit to
backplate as illustrated in Pig. 22 with spacers to rear and shaft
forward. Remove electrical disconnect by cutting the (2) wires.
Strip ends 1/2" for splicing to wall wire.
I NOTE: Shaft extension is not required for wall mounting, I
3 Select a location on a convenient inside wall, usu-
ally beside your furnace thermostat.
[] 4 Run low voltage wire through the wall, Exit hole must
be within the lower backplate opening. (Purchase additional
wire as required.)
[] 5 Connect low voltage wires from wall to previously
cut leads on humidistat by stripping ends and using wire nuts
(not provided). Position and fasten humidistat to wall with four
screws provided. Install cover by snapping onto backplate.
Press knob onto humidistat shaft. Make sure 1/8" air space is
maintained between wall and backplate to allow air circulation
and humidity sensing.
6 Connect wiring (Fig. 21). Remove electrical discon-
nect by cutting wires on harness, strip ends and splice to low
voltage wire from wall humidistat using wire nuts. (Wire nuts
not provided. Purchase them from your local Sears Hardware
Store.) Plug 24 VAC transformer into 120 VAC outlet. Do not
use existing transformer on furnace.
I NOTE: Humidifierhumidifiesonly when fumaco ison, however,
Media _ willtum wheneverhumidistatcalls forhumidity. J
8