


contents
WARRANTY ........................................... 2
BEFORE YOU START
Rules for Safe Installation
and Operation ................................... 2
Tools and Materials Needed .................. 2
UNDERSTANDING HUMIDITY .............. 3
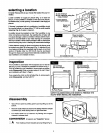
SELECTING A LOCATION ..................... 4
INSTALLATION ...................................... 4
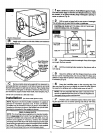
DISASSEMBLY ...................................... 4
WATER SUPPLY ................................... 6
HUMIDISTAT.......................................... 8
OPERATI_)N .......................................... 9 _
MAINTENANCE ..................................... 9
SERVICE HINTS .................................. 10
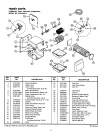
REPAIR PARTS .................................... 11
introduction
Please read the instructions before you install and use your humidifier.This will help you obtain the full value from the humidifier. It will
also help you avoid any needless service cost, if the problem is something we cannot control and cannot cover in our Warranty.
FULL ONE YEAR WARRANTY ON HUMIDIFIER
If, within one year from the date of purchase, this humidifier falls due to a defect In material or workmanship, Sears will
repair It, free of charge.
WARRANTY SERVICE IS AVAILABLE BY SIMPLY CONTACTING THE NEAREST SEARS STORE OR SERVICE
CENTER IN THE UNITED STATES.
This warranty gives you specific legal rights, and you may also have other rights which vary from state to state.
This warranty DOES NOT cover the replacement media pad.
Seam, Roebuck and Co., Dept. 817WA, Hoffman Estates, IL 60179
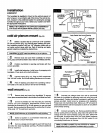
DO-IT-YOURSELF CHECK LIST
Ifyou feel the following operations are withinyour skills, you should
have no difficulty installing this humidifier.
[] Cutting and ddlling sheet metal.
[] Using hand tools: screwdriver, wrench, etc.
[] Hooking up low voltage electdcal connections.
SEARS INSTALLATION POLICY
AllinstallationlaborarrangedbySears willbe performedina neat,
workmanlikemannerinaccordancewithgenerallyacceptedtrade
practices.Further,all installationswill complywithall local laws,
codes, regulations,and ordinances.The customerwillalso be
protected, dudng installation,by insurancerelatingto property
damage, Workman'sCompensation,and publicliability.
Youmust realizethat the wrong use of any toolcan be danger-
ous. Be sureyou knowhow to use the tools and equipmentto
avoid any possiblehazards. If you have any doubtwe ask that
youcontactyourSearssalesperson.They willarrangefor profes-
sionalinstallation.
SEARS INSTALLATION WARRANTY
In additionto any warrantyextended to you on the Sears mer-
chandiseinvolved,which warranty becomes effectivethe date
themerchandiseisinstalled,shouldtheworkmanshipof any Sears
arrangedinstallationprovefaulty withinoneyear,Sears will,upon
noticefrom you, cause suchfaults to be correctedat no addi-
tionalcast to you.
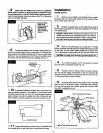
before you start
RULES FOR SAFE INSTALLATION & OPERATION
1. Read these rules and the instructions carefully. Failure to fol-
low the rules and instructions could cause bodily injury and/
or property damage.
2. Check your local building codes and utility standards. The
installation must comply with their rules.
3. Always shut offthe furnace blower before installing or servic-
ing the humidifier.
4. Always wear safety glasses when installing or servicing.
5. HUMIDIFIER MUST NOT BE INSTALLED IN AREAWHERE
FREEZING IS POSSIBLE OR LEAKING WOULD CAUSE
WATER DAMAGE.
6. Follow a regular service and maintenance schedule.
7. Always shut off electricity and water to the humidifier before
servicing.
8. When the furnace blower is used for air-conditioning, the hu-
midifier damper should be closed, and the humidistat should
be turned to the minimum humidity setting.
9. NEVER OILANY PARTOFTHE HUMIDIFIER.
10. To preventoverhumidification,humidifiermustnotbe oper-
ated above humidistat high position or above the +20
position (whichever applies) except briefly to test op-
eration after installation or servicing.
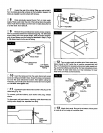
TOOLS AND MATERIALS NEEDED
• Safety Glasses
• Straight edge ruler
• Pencil or grease pencil
• Hand ddll or grounded
electric drill
• Ddll bits, 5/32", 1/8"
• Tin snips or metal
cutting saw
• Screwdriver (flat point,
medium size)
• File
Level
• Hammer
• Small adjustable wrench
• Center punch