


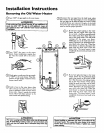

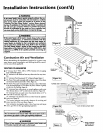

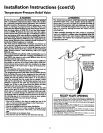
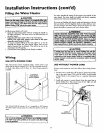


Installation Instructions (cont'd)
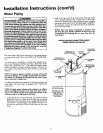
Water Piping
AWARNING
HOTTER WATER CAN SCAL_. Water heaters are intended to
produce hot water. Water heated to a temperatu_ which will
satisfyclotheswashing,dishwashing,and other sanitizing needs
can scaldand pen_anently injure you upon contact, Some peo-
dea_e more like/y to be permanently injured by hot water (_w1n
other_ These indude the elder_, children, the infirm, or physicak
ly/mentally handicapped.If anyone usinghotwater in your home
Etsinto one ofthese groupsor ifthore isalocalcodeor state law
_ ac_ain _ra_rau_ wat_- at the hot wa_erta_ th_
_u must take spechl preca_on_ In addition to using the
possibletemperatu_ settingthat satisfiesyour hot water needs,
l ameans suchasa mixing valve, shouldbe usedat the hot water
taps usedby these people or at the water heote_.Mbdng valves
are availableat plumbing supplyor hardware store_ Followman-
ufacturers instructions for installation of the valves. Before
changing the factory setting on the thermostat, read the
'_remperatore Regulation" sectioninthis manual
This water heater shall not be connected to any heating systems
or component(s) used with a non-potable water heating appli-
ance.
If a water heater is installed in a closed water supply system;
such as one having a back-flow preventer, check valve, water
meter with a check valve, etc.., in the cold water supply; means
shall be provided to control thermal expansion. Contact the
local utility or local Sears Service Center on how to control this
situation.
NOTE: To protect against untimely corrosion of hot and
cold water fittings, it is strongly recommended that didec-
tric unions or couplings be installed on this water heater
when connected to copper pope.
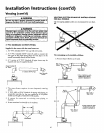
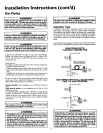
The illustration shows the attachment of the water piping to the
water heater. The water heater is equipped with 3/4inch water
connections.
NOTE: If using copper tubing, solder tubing to an adapter
before attaching the adapter to the cold water inlet connec-
tion. Do not solder the cold water supply line directly to the
cold water inlet or it will harm the dip tube.
1. Look at the top cover of the water heater. The hot water outlet is
marked hot. Put two or three turns of teflon tape around the
threaded end of the threaded-to-sweat coupling and around both
ends of the ¾" threaded nipple. Using flexible connectors, con-
nect the hot water pipe to the hot water outlet on the water
heater.
2. Look at the top cover of the water heater. The cold water
inlet is markedcold. Put two or three turns of teflon tape
around the threaded end of _e threaded-to-swear coupling
and around both ends of the ¾ threaded nipple. Using flexi-
ble connectors, connect the cold water pipe to the coldwater
inlet of the water heater.
NOTE: This water heater is insulated to minimize heat
loss from the tank. Further reduction in heat loss can be
accomplished by insulating the hot water lines from the
water heater.
INSTALLATION COMPLETED USING
SEARS INSTALLATION KIT
THREADED TO SHUTOFF
SVVEATCOUPUNG VALVE
THREADED TO
SVVEATCOUPLING
HOT OUTLET
TO HOUSE
NIPPLE
DISCHARGE PIPE
(Do not capor plug)
PROVIDE A 6" AIR
GAP BETWEEN THE
END OF THE
DISCHARGE PIPE
AND DRAIN
COLD INLET
WATER LINE
3/4"THREADED
NIPPLE
TEMPERATURE-
PRESSURERELIEF
VALVE
12