COLOR DOME CAMERA User Guide
28
COLOR DOME CAMERA User Guide
29
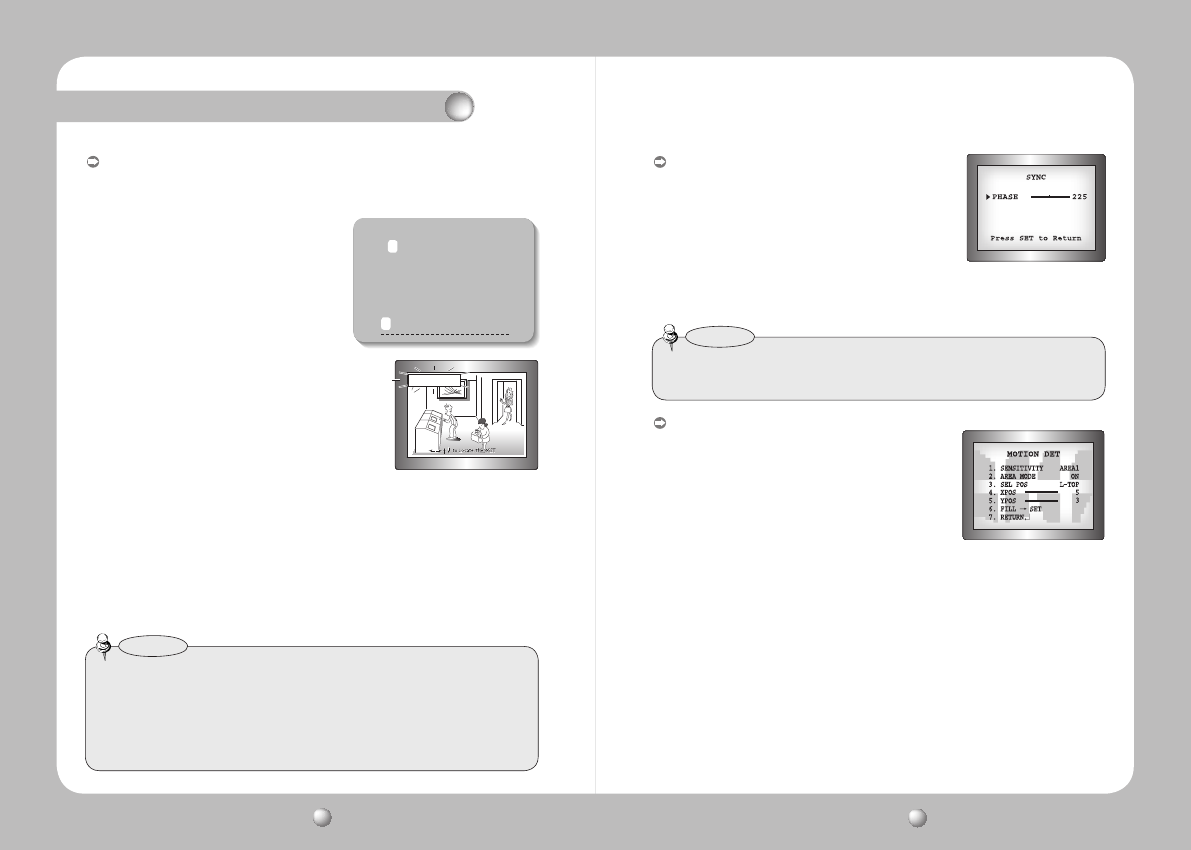
MOTIONDET
:
This product has a feature that allows you to observe
movement of objects in 8 different areas on the screen, and
thewords'MOTIONDETECTED'appearonthescreenwhen
movement is detected.
Activity can be monitor more efficiently.
1)WhentheSPECIALmenuscreenisdisplayed,pressthe
FunctionSetupswitchsothatthearrow
indicatesMOTIONDET.
2) SetupthemodeusingtheFunctionSetupswitch.
- SENSITIVITY : You can select up to 8 MD areas. When SENSITIVITY number is high, motion
detection sensitivity is increased to recognize even small movement.
- AREA MODE : Determines whether to use the MD area selected in SENSITIVITY.
- SEL POS : Determines which of the 4 vertices of each MD area is to be used.
- XPOS : Determines the coordinate of the horizontal axis for SEL POS.
- YPOS : Determines the coordinate of the vertical axis for SEL POS.
- FILLSET : Fills in a selected MD area. The color of the area can be selected from brown,
orange, blue, cyan, green, yellow, magenta and red.
- RETURN : Select this to save the MOTION DET menu settings and return to the SPECIAL menu.
SYNC:
Inareaswherethesupplyisat60Hz(NTSC),50Hz(PAL),
you can synchronize the output phase of multiple
cameras using the power synchronization function
(Line-Lock)withoutusingasynchronizationsignal
generator.
- INT : Internal Synchronization Type
- L/L : Power Synchronization Type, Line-lock
•PresstheFunctionSetupswitch.
•Youcanselectadesiredphasefrom0to359whenselect'phase'.
• When using AC power at 60Hz(NTSC), 50Hz(PAL) frequency, you can use the L/L type
synchronization.
• When the power is DC 12V, the SYNC menu is fixed to the ‘INT’ mode.
Notes
FRONT DOOR
• When the CAM TITLE menu is ‘OFF’, no title will be displayed on the monitor screen even if
you enter one.
• Only English is available in this mode.
• If you move the cursor to CLR and press the Function Setup switch, all the letters are
deleted. To edit a letter, change the cursor to the bottom left arrow and press the Function
Setup switch. Move the cursor over the letter to be edited, move the cursor to the letter to be
inserted and then press the Function Setup switch.
Notes
CAMERA TITLE SETUP
ABCDEFGHIJKLM
NOPQRSTUVWXYZ
abcdefghijklm
nopqrstuvwxyz
-.0123456789
CLR POS END
CAMTITLE:Ifyouenteratitle,thetitlewillappearonthemonitor.
1)IftheSPECIALmenuscreenisdisplayed,usetheFunctionSetupswitchsothatthearrow
indicates‘CAMTITLE’.
2)Setitto‘ON’byusingtheFunctionSetupswitch.
3)PresstheFunctionSetupswitch.
4)UsetheFunctionSetupswitchtomoveto
a desired letter and select the letter by pressing
theFunctionSetupswitch.Repeatthistoenter
multiple letters. You can enter up to 15 letters.
5) Enter a title, move the cursor to ‘POS’ and
presstheFunctionSetupswitch.Theentered
title appears on the screen. Select the position to
displaythetitleonthescreenbyusingtheFunction
SetupswitchandpresstheFunctionSetupswitch.
Whenthepositionisdetermined,select‘END’and
presstheFunctionSetupswitchtoreturntothe
SPECIALmenu.
Operating Your Camera


