


6
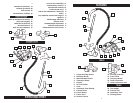
HOWTOASSEMBLE
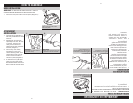
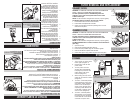
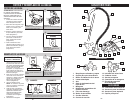
Diagram 1
Insert hose and press until it
locks into place.
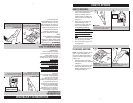
Diagram 1
Press tools into their location
on the tool caddy.
1.
1.
HOSEINSTALLATION
WARNING:
TO REDUCE THE RISK OF INJURY - UNPLUG
CLEANER BEFORE REMOVING OR INSTALLING HOSE.
1. Insert hose and press until it locks into place (Diagram 1).
ATTACHMENT
INSTALLATION
1. The hose can be used alone or
with many combinations of wands
and tools.
2. Attachments are packaged
separately in the box. To store
on the unit, press the tool
caddy onto the wand and
slide tools into their respective
locations (Diagram 1).
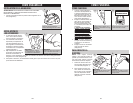
3. Choose any of the handy
accessories to meet your
various cleaning needs. Then
simply push it firmly o nto the
hose or wand end until it is
secured in place (Diagram 2).
4. To remove the tool, pull apart
gently. You may gently rotate
the attachment back and forth a
little to make the removal easier.
2.
Diagram 2
Simply push tools onto the hose
or wand end until it is secured.
6
ASSEMBLAGEDEL’ASPIRATEUR
Diagramme 1
Insérez le tuyau en appuyant jusqu’à
ce qu’il s’enclenche (Diagramme 1).
Diagramme 1
Placez les accessoires dans
le support à accessoires.
1.
1.
AVERTISSEMENT : AFIN DE RÉDUIRE LES RISQUES DE
BLESSURES, DÉBRANCHEZ L’ASPIRATEUR AVANT D’ENLEVER
OU D’INSTALLER LE TUYAU.
1. Insérez le tuyau en appuyant jusqu’à ce qu’il s’enclenche
(Diagramme 1).
INSTALLATION DES
ACCESSOIRES
1. Le tuyau peut s’utiliser seul ou
avec une combinaison de ral-
longes et d'accessoires
2. Les accessoires sont emballés
dans une autre boîte. Pour
ranger l’appareil, encastrez le
support à accessoires dans la
rallonge et insérez les acces-
soires dans leurs comparti-
ments respectifs.
3. Choisissez l’accessoire le
mieux adapté à vos besoins
de nettoyage. Ensuite, enfon-
cez-le fermement dans le tuyau
ou l’extrémité de la rallonge
jusqu’à ce qu’il soit bloqué
(Diagramme 2).
4. Pour enlever l’accessoire,
détachez-le avec soin. Faites-
le pivoter doucement d’avant
en arrière pour l’enlever plus
facilement.
2.
Diagramme 2
Insérez simplement les accessoires
dans le tuyau ou la rallonge jusqu’à
ce qu’ils s’enclenchent.
INSTALLATION DU TUYAU