


Installing the Appliance in Position
When the gas supply pipe has been laid to the position required, the surround should be fitted and sealed to
the chimney correctly. This is to prevent any seepage of flue products or to prevent any ingress of air into the
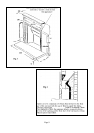
flue from anywhere other than the flue outlet of the fire. The easier method of installation is through the holes
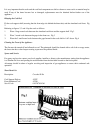
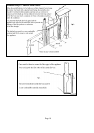
provided in the front face of the vent box - this method will require drilling into the back panel of the
surround. See Fig 8. Where it is undesirable to deface or damage the back panel, a cable fixing kit is provided
which can be fastened to the inner walls of the opening and the back of the box, see Fig 9.
Before offering the vent box into the opening, the hearth should be protected from damage or scratches that
may occur during installation.
Locate and secure the firebox by the method chosen ensuring that a good seal exists with the back panel. Lay
a gas supply to the location of the burner connecting elbow and place the burner into the vent box locate the
facia panel cut-out over the flange on the baseplate and secure into position with the 2 x No 8 self tap screws
supplied - complete the gas connection.
Note: The complete installation should be tested for Gas soundness.
Fit the brass trim in position and remove the plastic coating from the brass finish.
Laying the Coal Bed
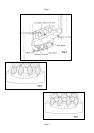
Fit the coal support shelf (ensuring that the front edge sits behind the three tabs) and the simulated coal front.
Fig 10.
Referring to figures 10, 11, 12 and 13 lay the coals as follows: -
1. Place 4 large round coals between the simulated coal front and the support shelf. Fig 12
2. Place 3 round coals between the gaps in the front row. Fig 12
3. Place the 5 small round coals between the gaps formed in the coals laid in 1 & 2 above. Fig 13
Checking Operation of Fire
Turn on the Gas supply at the meter and to the appliance at the isolating cock. Purge the air to the appliance.
Rotate the control knob to the ignition position, depress the control and push the piezo to ignite the pilot.
Check that the electrode is sparking between the tip of the thermocouple and continue until a pilot ignition is
established. Depress the control knob slightly and rotate anti-clockwise until the index symbol is aligned with
the small flame symbol on the indicator label. Release and rotate the control knob to the high position (large
flame symbol) and check that the flame picture is satisfactory, then release the control knob - if the pilot does
not stay alight repeat until the pilot remains alight with the knob released. Turn the gas control to the OFF
position, wait for 90 seconds, fully depress the gas control, turn to the ignition position and release the
control. Attempt to light the pilot with an already prepared match or taper, if the pilot lights the FSD is faulty.
Page 6