


15
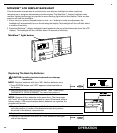
Programming with QuickSet™
NOTE: To save valuable programming time, QuickSet™ allows you to set one schedule that is automatically copied
to each individual day of the week. You may then go into the program and change any specific day, time setting, or
temperature setting to suit your personalized schedule.
NOTE: The thermostat will not allow programs to be entered in the OFF or AUTO modes. DO NOT program in EMER
mode of operation. Program in HEAT or COOL modes only.
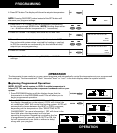
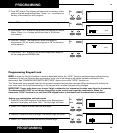
1. Press the SYSTEM button until the word “HEAT”or “COOL” appears
on the right side of the display.
2. Press QUICKSET button.The display will show all the days of the
week at the top of the display. This signals that you are in
QuickSet™ mode. "MORN” is the first setting for the day. The
display will show the setpoint time.
3. Press either ∨ or ∧ button to adjust the time setting for MORN.
(Note: Holding down either ∨ or ∧ button scrolls the time in 30 minute
increments.)
MON TUE WED THU FRI SAT SUN
MORN
AM
MON
HEAT
MANUAL
AUTO FAN
F
PM
MON
COOL
MANUAL
AUTO FAN
F
PM
SYSTEM
QUICKSET
PROGRAMMING
26
You may press the ∨ or ∧ buttons to temporarily change the
programmed temperature while in COOL or HEAT mode. The ∨ or
∧ buttons will not change the setting while the system is in AUTO.
You may also press the PROG/MAN button to change to manual
mode and manually change the temperature settings.
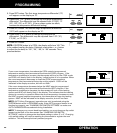
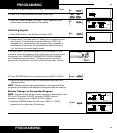
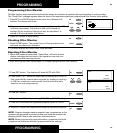
Resetting the Thermostat
If you ever experience a problem with the thermostat and find it is
not working correctly, or want to erase the ENTIRE program,
simply press and release the reset button. To access the RESET
button, remove thermostat from wiring subbase. (See
“REMOVING THERMOSTAT FROM WIRING SUBBASE.”) Note
reset location as shown in Figure 2. Use a small pin or paper clip
to push in the reset button.
The reset button is only accessible when the main unit is removed
from the wiring subbase. See “REMOVING THERMOSTAT FROM
WIRING SUBBASE.” This button will clear all the programs you
have set and revert to the default settings.
RESET
- + - +
- + - +
Figure 2
OPERATION