


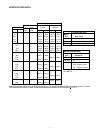
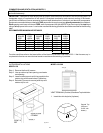
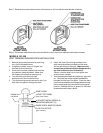

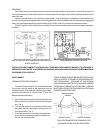

DRAFTHOOD
JACKET TOP PANEL
(part of the heater)
#10 SHEET METAL SCREW (3)
MOUNTING BRACKET (3)
FLUE COLLECTOR
(part of heater)
S
CREW HOLE
L
OCATION
3-1/4"
INNER STACK ADAPTER PANE
L
Fig. #8947
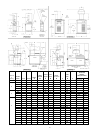
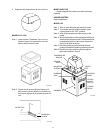
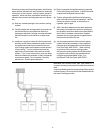
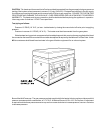
Step 8: Disconnect male/female connector and attach to the 2 wires from drafthood vent sensor harness.
Step 7: Remove door and locate wire from roll out sensor to Hi Limit with the male/female connector.
12
Fig. #8246.5
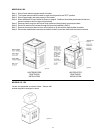
MODELS 181-399
VENT TERMINAL/INDOOR STACK INSTALLATION
1. Remove the louvered jacket top by removing
four (4) #10 flat head screws.
2. If originally installed, remove "Pagoda" top
from the louvered jacket top.
3. Place the inner stack adapter panel over the
flue collector inside the heater. Make sure
the flanged side of the flue opening is up.
4. Turn the stack (draft hood) up side
down and set it down bottom side up.
5. Turn the jacket top panel (removed in step 1) up
side down and place it through the stack.
6. Attach the three (3) mounting brackets to the
stack using the screws provided and the holes
that are pre-drilled in the stack. Make sure the
brackets are positioned with the flange near the
top side of the stack (see illustration).
Caution must be taken not to over tighten and
strip the screw threads.
7. Turn the assembled stack and jacket top, right side
up. The jacket top will be trapped between the
brackets and the top of the stack. Place the stack
over the inner adapter panel flanged hole and lower
the louvered jacket top panel back into its original
position. Reinstall the four (4) green #10 flat head
screws removed in step 1 above.