RCA L Version 2.0 30
6.5 Repairs & Removals
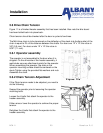
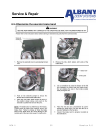
6.5.1 Removal and Re-installation of curtain in guides
1. Utilizing a 3/8” wrench, unbolt the hinged front guide plates of both the left and right
guides. Swing the front guide plates open and place them to the side.
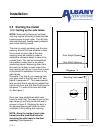
2. In the event that only the upper portion is hinged, raise the curtain and bottom bar until
the bottom bar front angle is just below the open hinged portion. Then, lift the curtain
one end at a time, out of the guides and set it outside the front guide plates.
3. Lower the curtain slowly and make sure that it does not catch on the guides. To re-
install the curtain, follow the above steps in reverse order. Be sure to close and bolt the
front guide plates prior to putting the door back into operation.
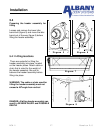
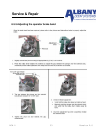
6.5.2 Removal and Re-installation of curtain in bottom bar
1. With the curtain and bottom bar supported on a flat surface, loosen the bolts which
secure the bottom bar to the curtain.
2. Slip the curtain out of the bottom bar. To re-install the curtain back into the bottom bar,
follow the above steps in reverse order.
If the bottom bar is equipped with an electric reversing edge, be sure to unplug the connector
when removing the bottom bar. In addition, take extreme care not to damage the electric
reversing edge fabric. A puncture would allow moisture to penetrate it, thus causing
premature failure of the reversing edge.
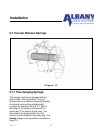
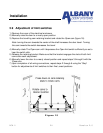
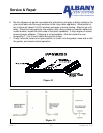
6.5.3 Repairs to rubber curtain – rips or perforations
In order to work on the ripped or perforated area, the curtain must be taken out of the guides
and lowered to the floor. Then, either work on an area supported by the floor or alternatively,
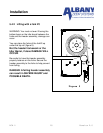
a solid, level surface provided by a heavy table, for example. Refer to Figure 31 and 32 for
positioning of the curtain prior to repairing it.
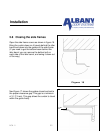
1. Using a utility knife, set it to a depth that will penetrate the rubber down to the nylon cord
centre of the curtain and cut a rectangular or square section approximately 2" wider than
the sides of the rip or perforation. Be careful not to cut the nylon cord itself (see Figure
31).
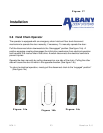
2. Using a screwdriver and pliers and starting at one corner of the cut, peel the surface
from the nylon cord centre within the perimeter of the cut.
3. Using coarse sandpaper or a wire brush, remove loose rubber particles from the nylon
cord centre. However, it is not necessary to have the fabric 100% bare.
4. Flip the curtain over to the other side of the rip or perforation and repeat Step 1 through
Step 3.
5. From the
1
/
8
" thick piece of repair rubber, cut some pieces to inlay into the prepared
areas. Using a grinder with a sanding disc or a wire brush, roughen-up the inlay
surfaces for bonding.
Service & Repair