


Constant Running Hydraulic Pump - Installation Guide 13
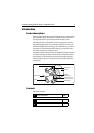
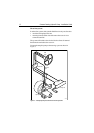
4. Connecting to the course computer
WARNING: Electrical safety
Make sure the power supply is switched off before you make any
electrical connections.
The CR pump has electrical connections for:
• motor supply: two single-core cables
• solenoid control valve supply: two plug-in connectors (supplied)
Note: When routing cables, refer to the EMC installation guidelines.
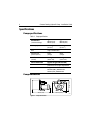
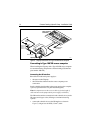
Connecting to Type 150/400 course computer
Make the following connections:
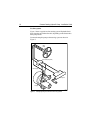
1. CR pump motor supply:
• using appropriate cables (see Table 2) connect the CR pump
motor to the boat’s power supply, via an appropriate circuit
breaker and fuse (as specified in Figure 6)
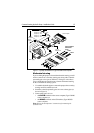
2. Solenoid control valves – using suitable cable (at least 16 AWG or
1.5 mm
2
for runs up to 16 m/52 ft):
• for the first valve: connect one core to the
MOTOR A terminal
and the other core to one of the
SOLENOID terminals at the
course computer (see Figure 6)
• for the second valve: connect one core to the
MOTOR B
terminal and the other core to the other
SOLENOID terminal
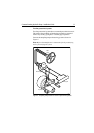
Note:
If installing the pump on a boat with mechanical steering, you
need to connect a bypass valve to the
CLUTCH
terminals (see page 15).
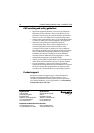
Table 2: Recommended cable sizes
Pump motor cable length
(distribution panel to pump)
Cable gauge
(AWG)
Copper area
(mm
2
)
12 V CR pumps
up to 3 m (10 ft)
up to 7 m (23 ft)
up to 16 m (52 ft)
10
8
6
6
10
16
24 V CR pumps
up to 3 m (10 ft)
up to 5 m (16 ft)
up to 10 m (32 ft)
up to 16 m (52 ft)
12
10
8
6
4
6
10
16